Today, I am going to guide you through how to build an SMTP server and send unlimited emails using mailinabox. In my last post I talked about how you can build an smtp server and send unlimited emails using postal Mail transfer agent. This technically means there are different ways to build smtp server to send unlimited emails. We have postal, powerMTA, postfix, exim etc. Though, these mail transfer agents vary from one another in terms of speed, realiability, processing power and alot of other features. But let’s limit this guide to build SMTP server with Mailinabox.
What is Mailinabox?
Mail-in-a-Box is a free, open-source program that simplifies self-hosting an email server. It offers a web-based control panel for managing email accounts, aliases, DNS records, and backups, enabling users to regain control of their email.
Mail-in-a-Box include and configure Postfix as a core component of its complete email solution. it provides an all-in-one solution by including an SMTP server and other essential components. Mail-in-a-Box is designed for ease of use, making it accessible for individuals looking to manage their own email infrastructure.
Mailinabox Setup: Step by step Guide
In this build SMTP server with Mailinabox we need just two things:
- A domain name and you can get in Namecheap, godaddy or any domain registrar of your choice.
- A VPS Server with port 25 open. I recommend you go with Contabo or Verpex because they have port 25 open by default.
Let’s set up a virtual private server (VPS) on a your preferred VPS or cloud providers. I choose Contabo for this guide as they offers solid server resources at affordable price, with port 25 open by default. Port 25 must be open for your postal smtp setup to work optimally. so if you are not going with contabo or verpex pls ensure port 25 is open on the vps provider you are using.

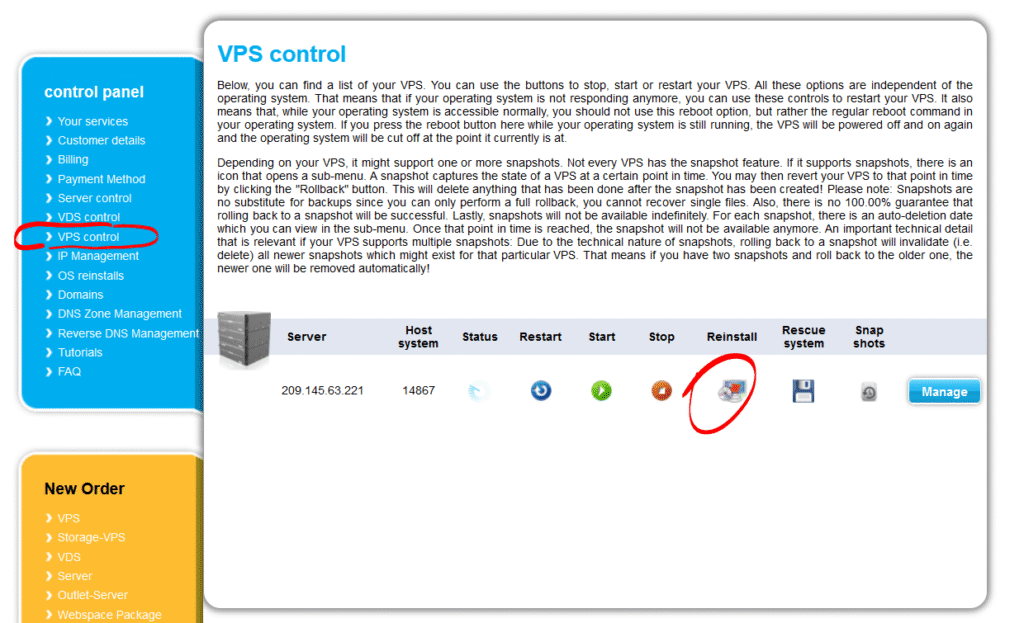
Configure Ubuntu 22.04 OS and place your order. Just in case you have another OS installed such as Cent or you ordered VPS with some other OS, follow the picture below to reinstall Ubuntu 22..04 on your VPS.

Add a Custom Nameservers
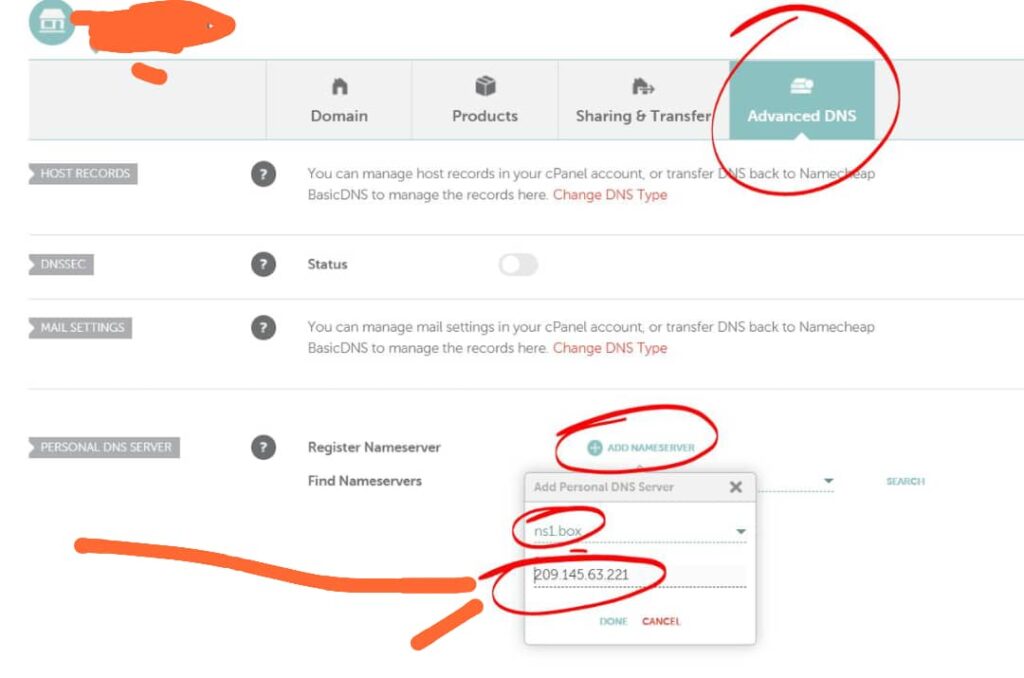
In this step we need to add a custom nameservers. In this tutorial I used namecheap, but the process is same Godaddy and for all domain registrars. Just follow the step blow and you will be able to do same in your registrar.

Now, click on add nameservers to add a custom nameservers. Change it to the following:
ns1.box.j-insights.info
ns2.box.j-insights.info
Accessing your VPS server through SSH
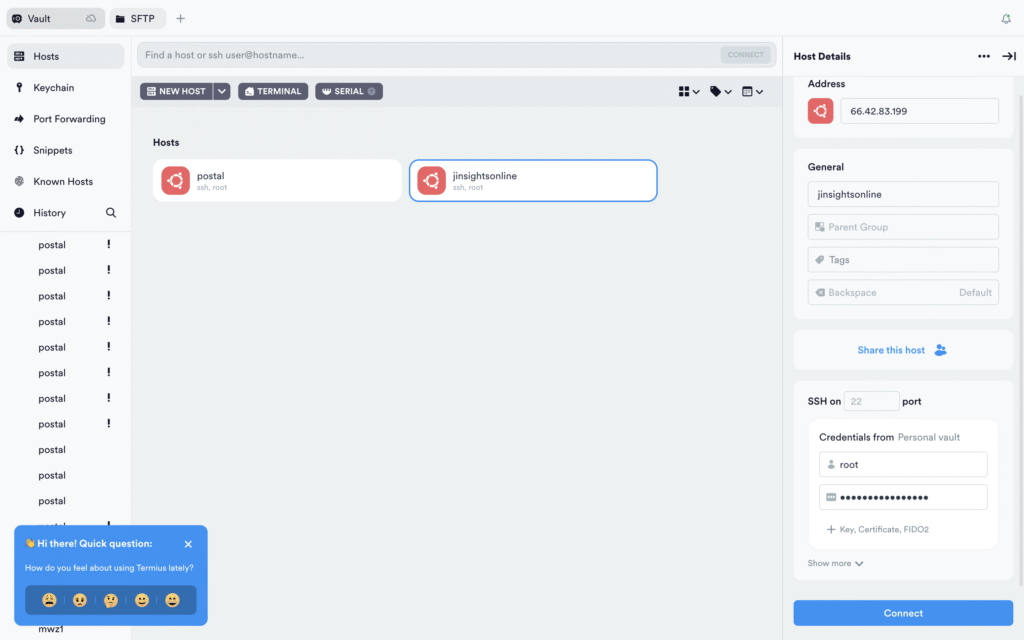
To connect to your server, you need an ssh client. If you are on mac, you can connect using your mac terminal. Then for window users, you can download the putty(for window users only) server or termius(Compatible with all operating systems). I love using termius because I can use it to manage both my file system and ssh in one place.
If you are using your mac terminal, open the terminal and run the following command:
ssh root@YOUR_SERVER_IP
Ensure you replace the ‘YOUR_SERVER_IP‘ part to your VPS IP. If you are prompted to input your server password, input it, it may not be visible, but just type it. Hit on enter and you will be in your server command line like this:

Then for termius click on add host add your server ip address and password seen as the right side of the sofrware as in the screenshot below: Click on connect and you will be in your command line.

Installing Mailinabox
First switch to superuser elavated privilage by running the following command:
sudo -i
Test whether port 25 is open on your VPS
apt install telnet -y
telnet smtp.gmail.com 25
You will see Connected success message. If you didn’t see the success message that means port 25 is blocked on your server and you have to email your hosting provider for unblocking or buy vps from companies that has port 25 open.
Next, set the hostname with the following command,
hostnamectl set-hostname box.j-insights.info
Replace j-insights.info with your domain name. Please leave the box as it is. After that, update the server with following command:
apt update && apt upgrade -y
Now run the following command
curl -s https://mailinabox.email/setup.sh | sudo bash
Answer questions which will appear on your screen. If asked for email id type
At the end of installation you will asked for user name and password. Enter it and you are done.
Finalizing Installation
Now go to URL https://box.j-insights.info/admin and login. If any thing is not in green address there is an issue.
You can add users and find SMTP details in relevant menus inside mailinbox.
As you can see, to build SMTP server with Mailinabox is very straightfarward and easy. You just have to run a few command and you are up and running.
Use platforms like mail-tester to test your sending score before sending. You can also follow this article to understand the concept of warmup before sending out any email. If you send out a lot of emails at once your emails will be blacklisted.
