There have been different ways to go about mailwizz installation but in this tutorial, we are going to learn practically the most cost-effective way which is, mailwizz installation on a folder of your shared hosting.
The reason I love this method as opposed to other methods of mailwizz installations is that you never need to pay any extra money to host your mailwizz email marketing application. All you just have to do is to create a folder or directory and upload your mailwizz and follow the installation processes.
The question now is …. Are the other alternatives available for installing mailwizz and are they more reliable in terms of performance, resources, and bandwidth than installing on shared hosting? These are all we are addressed in this tutorial including the steps outlined in the Mailwizz main website………continue reading……
The video below shows an alternative way of installing mailwizz, which is on a VPS server.
How do you locate your Mailwizz Installation directories online?
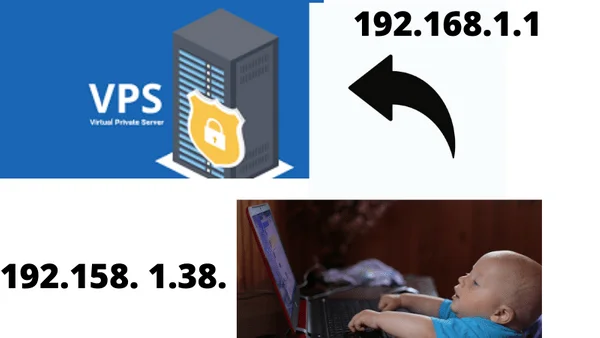
To locate a directory online, that folder has to be situated on a machine with a public IP. This IP address is discoverable by other machines which might be your mobile phone or desktop. Your mobile phone or desktop also has an auto-assigned IP address. This makes it discoverable online by other machines such as the VPS or shared hosting where you hosted your mailwizz.
Through the help of your web browser, queries are always sent from your local computer or mobile with an auto-assigned IP address to the public address where your Email marketing application is hosted. This IP address could be a VPS machine or a shared machine. Now let us see the difference between VPS hosting and shared hosting. We will see the reasons we chose to install mailwizz on the shared host as opposed to a VPS server.
What is the difference between VPS and Shared hosting?
VPS is short for a virtual private server. When you host anything on a VPS server say ,,, maiwizz or your website, it could be hosted alone on a single machine which can be a VPS server. It can also be hosted together with other websites owned by other people ( This is called shared hosting ). So, the implication of this is that if we have a private server, we have total autonomy over that server and we can determine what is and what is not placed on that server. For instance; we may decide to install only our mailwizz on that VPS or host our sites + install mailwizz. This means that we have full control over the server and can manage the server resources for high performance.
This is not achievable with shared hosting. In shared hosting, a lot of other websites are hosted together with your own website on the same server or machine. Although there are always a particular amount of resources allocated to each of the shared hosting plans, that doesn’t take away the fact that many websites are on the same server. In the same way, you want to install mailwizz as an additional load on your own disc space in the same way other clients on the same server are uploading more resources on their own disc space on the same machine. This brings us to the WHY do we still go ahead with shared hosting as a viable option seeing we have more control using virtual private servers (VPS)?
Why mailwizz installation on shared hosting?
As hinted above, the main reason for rooting to install mailwizz on shared hosting is only to save costs that could have been incurred in VPS hosting. VPS hosting is very cheap and affordable and in this way, you will get more performance and higher email delivery speed. But, the sole reason for this tutorial is to show you how you can run mailwizz installation on shared hosting, where your website is also hosted. You don’t have to pay extra since you are installing it on a folder on your website. This saves you some form of cost as you will never be paying for anything for hosting your mailing application as your Webhosting cost already covered your mailwizz hosting cost.
Effects of hosting Mailwizz on shared hosting.
The major side effect of installing mailwizz on shared hosting is that it adds to your disc space. This means that it adds more load time to your website which translates to less visibility of your website on google search results and other search engine search results. I think this generally poses a reduced user experience on your site even when SEO is not of importance to you. You can also check this article on mailwizz forum for more information about the limitations of hosting mailwizz on a shared host.
Which Shared hosting platform is best for Your mailwizz installation?
It is worth mentioning that, not all shared hosting platforms allow to install scripts such as mailwizz on their server. This is because some PHP functionalities are disabled on a shared host. So, you have to find a shared hosting platform that allows the PHP functionalities that allow mailwizz installations. I can attest to this because sometime in the past I tried installing mailwizz on a folder in my Namecheap hosting account. After the installation, in like 2-3 days’ time, the installations were removed. The goal now is to find a shared hosting platform that allows the installation of scripts such as mailwizz in their server and at the same time, their servers are very fast in such a way that after your mailwizz installation and uploading your huge email list, the server will balance the load and maintain its supersonic speed.
After days of research, I found speedyconnect.net the best and cheapest shared hosting platform for this job. You can visit Speedyconnect and use the code 50%offunlimited to secure 50% off your purchase. This being said ….let’s go to the main installation process.
Mailwizz installation Full Guide
The first thing to do is to log in to your speedyconnect Cpanel or direct admin. After you’ve been logged in > search for file manager>locate the domain you want to install mailwizz on its folder> Public_html> create a new folder
How to create a folder
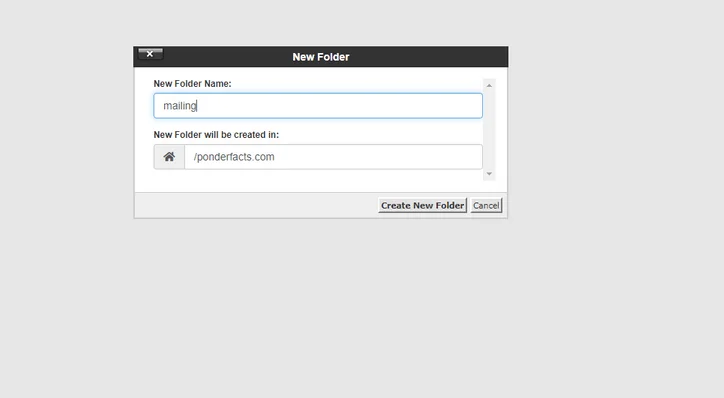
As shown in the picture above, create a folder and name it anything you want, in my own case I named its mailing. Feel free to name your own folder or directory anything you want, but bear in mind that to locate the mailwizz file you have to type the correct folder location correctly. Hope it is that simple 😊
Let’s move on…….
How to upload Mailwizz to a folder
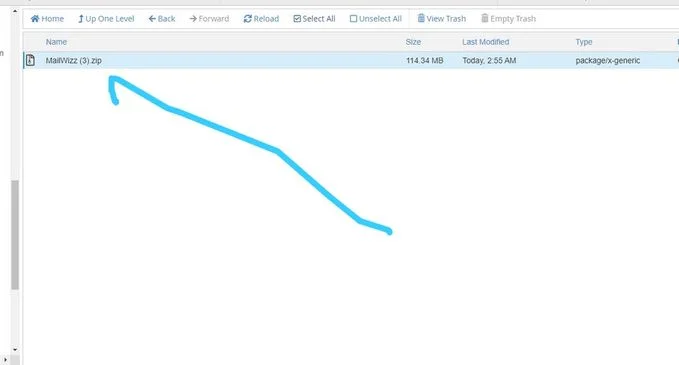
Here open the folder you created and click on upload as shown in the picture above. Watch the progress banner read. Once the upload is successful you will see the uploaded mailwizz zip file just like the picture above.
Pls, note that you must upload the zip form of your mailwizz file. If after downloading your mailwizz from evanto marketplace or codecanyon and it wasn’t zipped for you, make sure to download WinRAR or any application that can help you to zip files and ensure to zip the mailwizz file before uploading it to the folder you created.
That being said …..let’s move swiftly………
Unzipping the Mailwizz File in the created folder
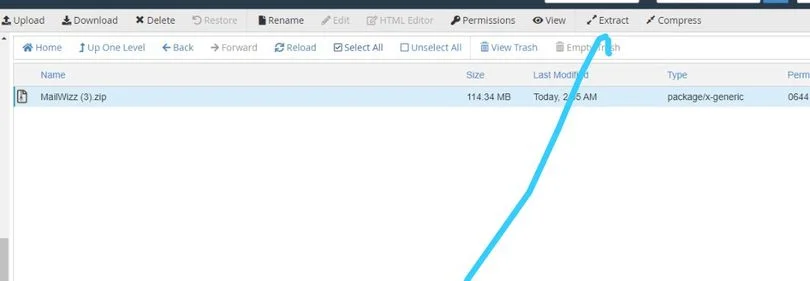
As in the picture above, click on Extract, Don’t worry if speedyconnect or any platform you are using has changed the UI of their site, the process is always identical.
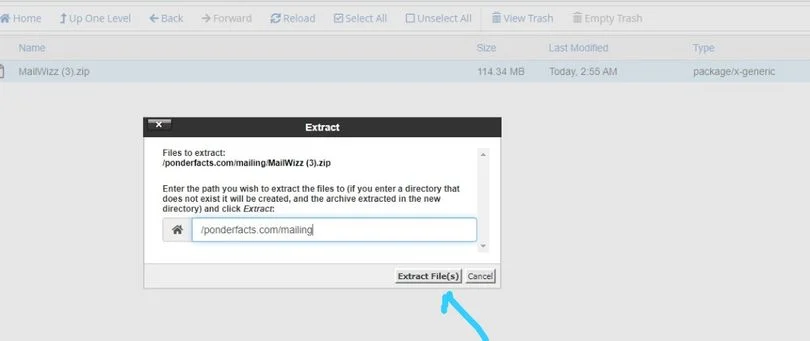
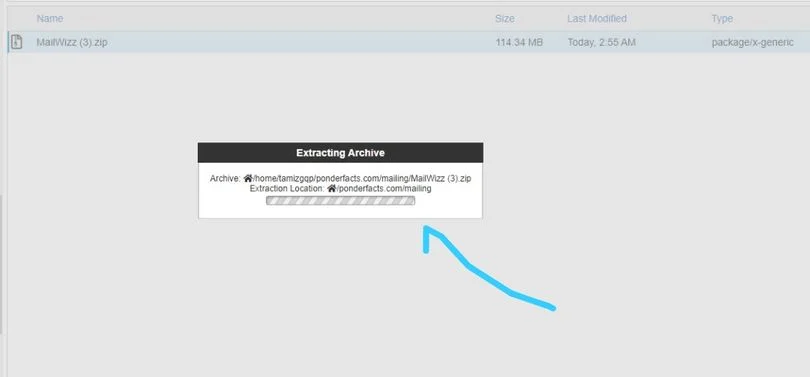
Once you click on extract you will see a picture like the one above. First, you will see the extraction progress banner of the zip file. It looks exactly like the picture below…
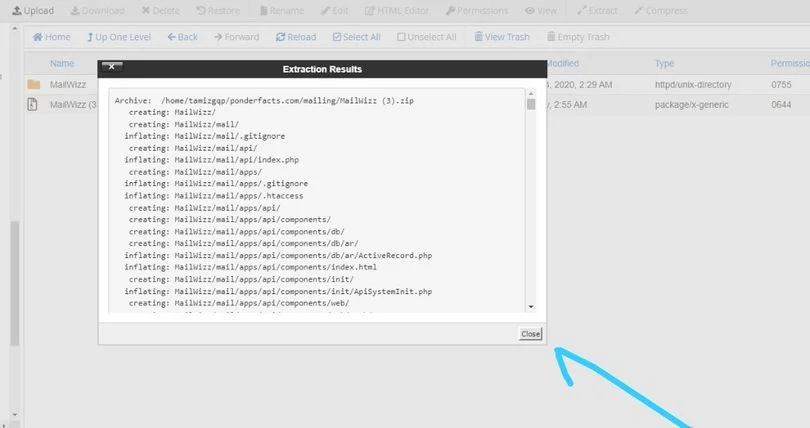
After the extraction, you’ll get a picture like this…
Click on close and you will see the extracted file like this
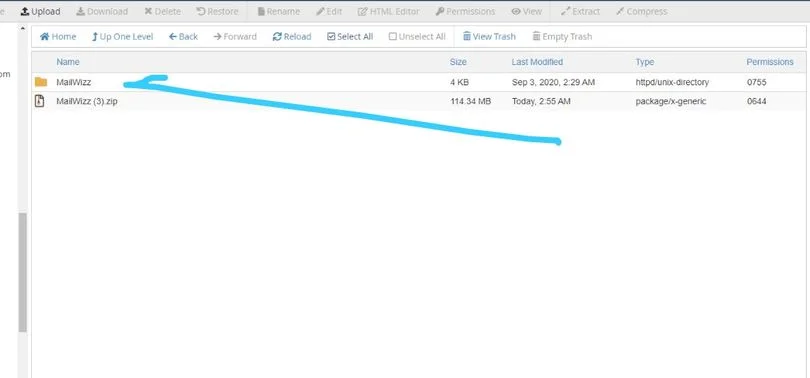
open the extracted folder, and you will notice that there is an extra folder that contains the mailwizz file. In my own case, I named it mail. See below…

The recommendation is that you move all the mailwizz files to the parent folder if it is in a folder inside another folder. My mailwizz files are contained in a folder named mail in another folder named mailwizz. Let’s show this pictorially.
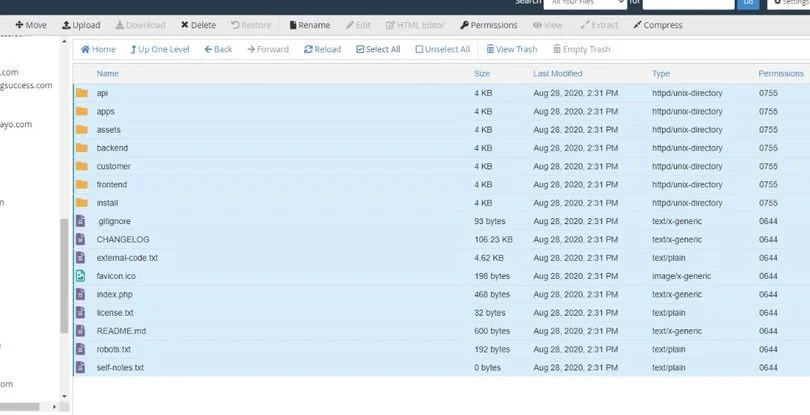
This is the mail folder in my own case which in turn contains the mailwizz files. Once you click on it you will see the mailwizz files as shown above.
Then if you look at the file above clearly you will see the mailwizz installation folder.
Now let us move all the files to the parent folder before we locate the installation directory or path. Click on select all as I have selected everything in the above picture and click on move. You will be shown an option of which of the folders you want to move all the mailwizz files to.
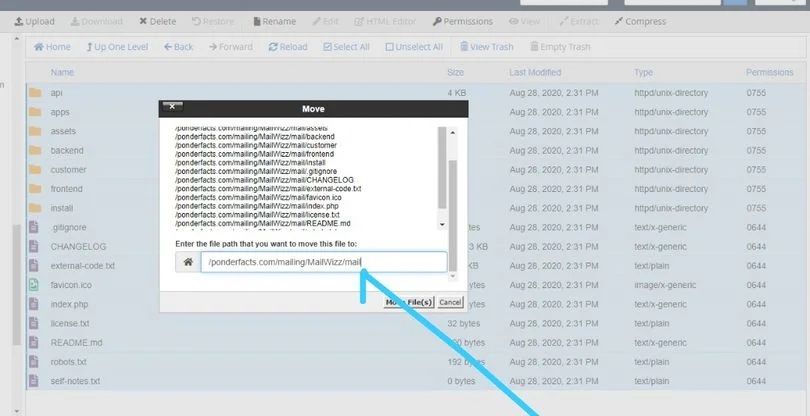
Simply delete the mail folder and leave only mailwizz folder and click on move files.
You will notice that the mail folder which previously contains the files is now empty. Now you can delete the mail folder since it is now useless anyways.
How to locate the mailwizz installation directory
Now is the time to locate the installation file and run our mailwizz installation. Go to your web browser and type the installation path which in my own case is ponderfacts.com/maing/Mailwizz/install. Ensure to type the correct path with the correct case. The cases of your folders or directories are very important as the mailwizz installation path is not gonna resolve if the case is wrong.
Once you type it correctly you will be greeted with a success or welcome message like this……
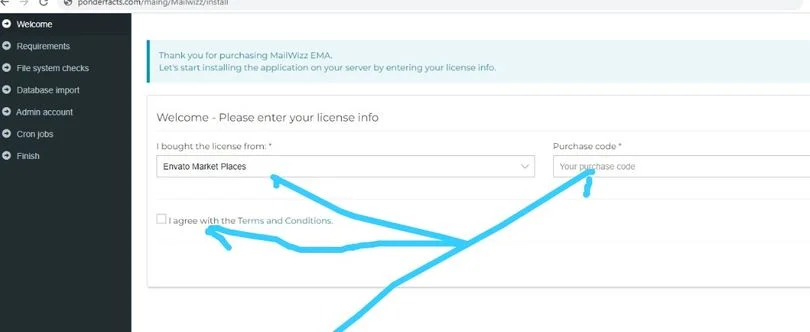
Under the ‘I bought my license from’ field, input anything you like, then input your mailwizz purchase code. Agree to the terms and click on continue.
Mailwizz server requirement check
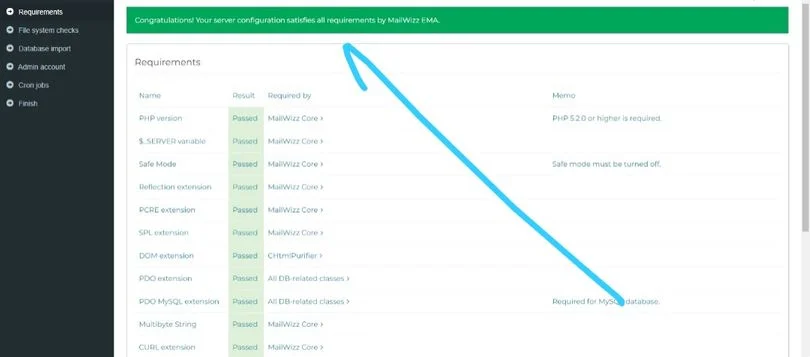
You will see a success message like this that your server configurations satisfy all requirements of the mailwizz email marketing application. Just scroll down and click on next
Mailwizz file system check
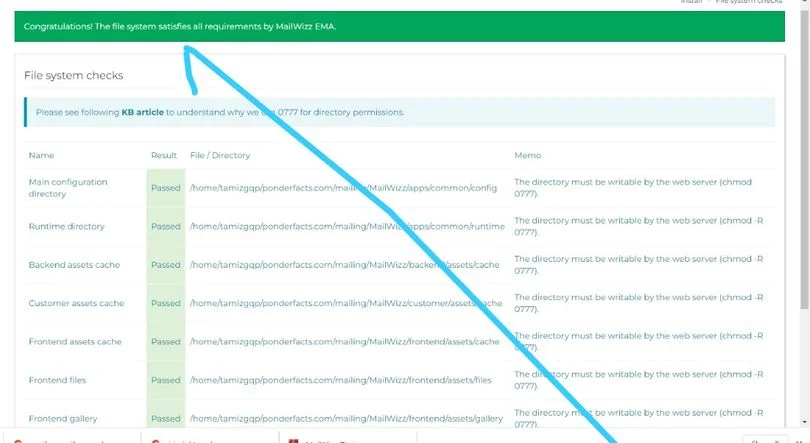
You will see a picture like the one above telling you that your file systems satisfy all requirements of the mailwizz email marketing application. Scroll down and click on next.
Mailwizz Database Import
Here you will have to create a database where your mailwizz data is gonna be stored. To create a database navigate back to your Cpanel or direct admin and locate the MySQL database. Create a new database. To make things easy here I recommend you use the same name as the username, this way you don’t have to deal with different logins, even when you rarely use them anyway.
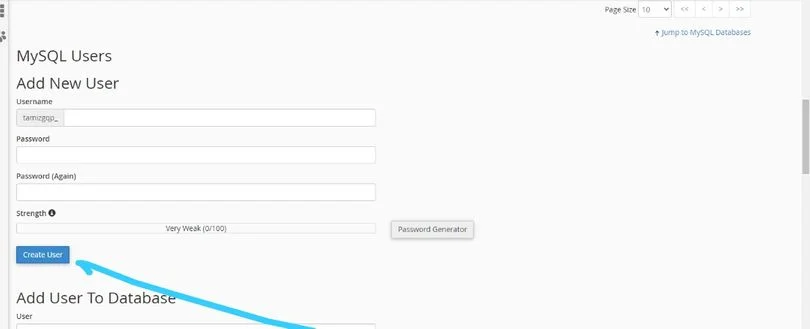
Now, go back to your mailwizz and installation directory and add both the database name, username and password.

Note: after creating the database, make sure to add the user to a database and allow all privileges, and click on make changes.
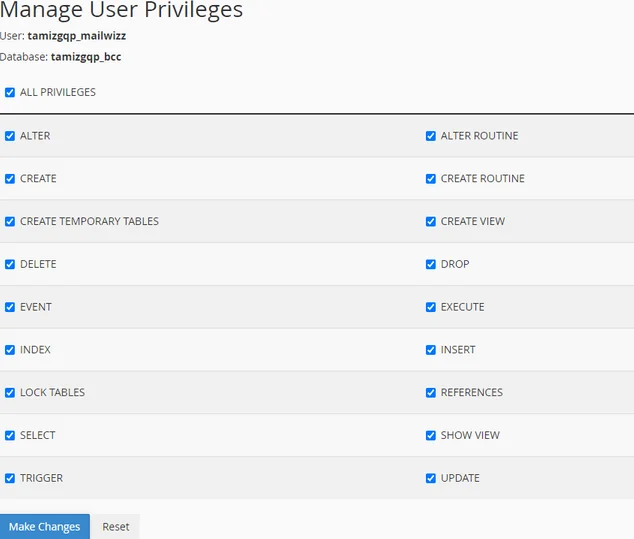
This is very important because if you don’t fix this, the database import will not work on mailwizz. Now click on start importing. See that you will be greeted with your next action.
How to create an account with mailwizz.
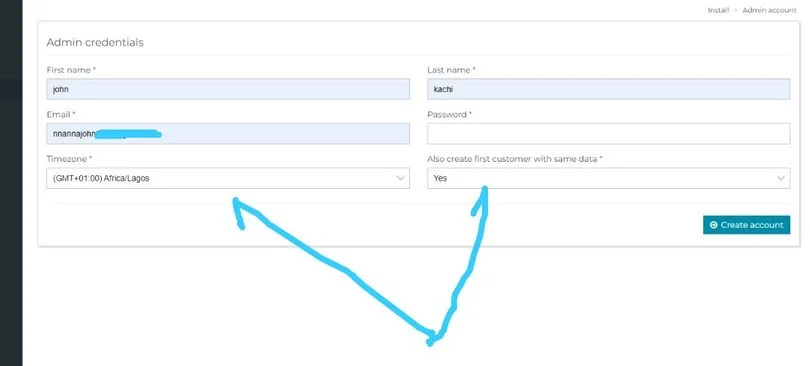
Here you will be able to choose your time zone ( in my own case is GMT+1Africa/Lagos Nigeria ) as well as create your customer area and backend login details. Here you have the flexibility of creating your customer area and backend area with the same login or different logins. But I recommend checking yes to avoid having a lot of different logins. Define your login emails and password and click on Create an account.
You will be greeted with bunches of cronjobs. Just click on cronjobs are installed, continue
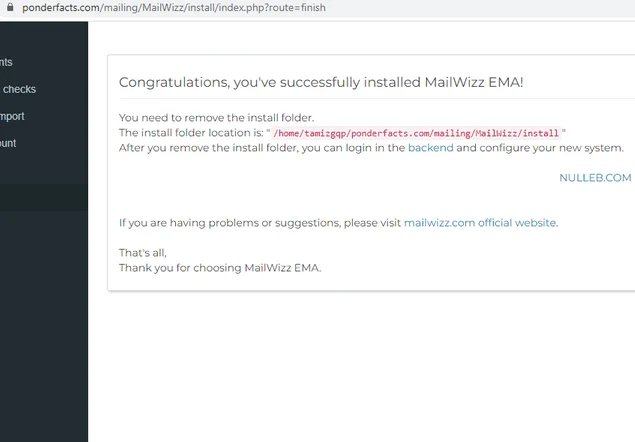
Wow …… you have just installed mailwizz. See that you are required to remove the installation directory or file. This is very important to keep your mailing application accessible only to you. This is because if that bad guy has access to the installation file, all your file systems could be modified.
So let us go back to the mailwizz file and delete the install folder.
Also, don’t forget to delete the main mailwizz zip file. Take note here friends… I never said the extracted folder. If you go and delete the extracted folder you will start all over again and you wouldn’t want that. Only delete the zip file and the reason for this is so that it won’t just be there posing an extra load on your server as it is now useless.
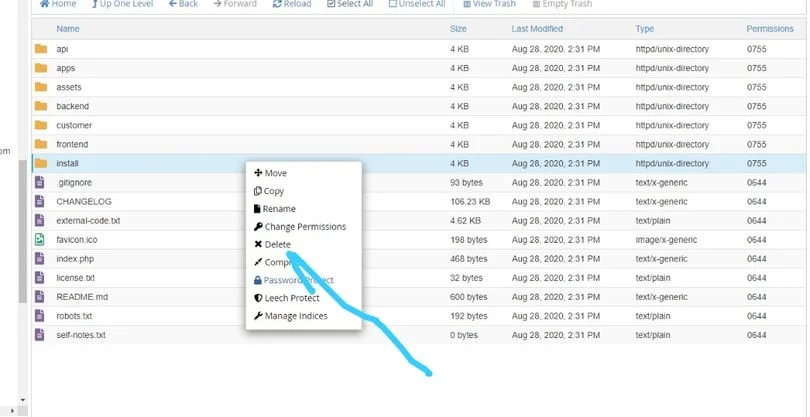
After the deletion go back to your installation directory and click on finish
How to login to mailwizz
Here it depends on which part of our mailwizz mailing application we want to login to. We can log in to the customer area or the admin area or the backend.
Here are what the login URLs of both the customer area and the backend look like
For the customer area: https://ponderfacts.com/mailing/MailWizz/customer/index.php/guest/index
For the backend area: https://ponderfacts.com/mailing/MailWizz/backend/index.php/guest/index
Since you created both areas with the same login you can now login to each and every one of them with the same login.
It really been a long tutorial and celebrate you king or queen for staying with me this far. Now let us login and see what mailwizz customer and backend area look like.
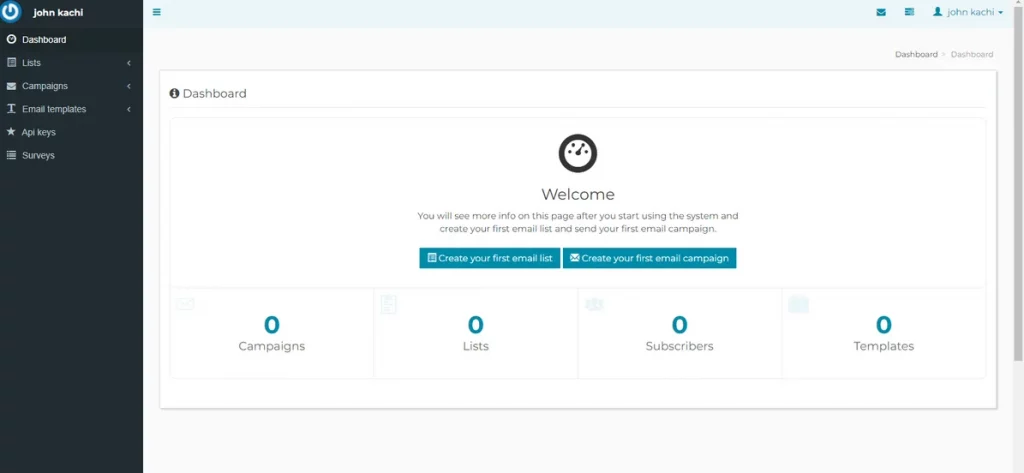
Now you can create your first email list and campaign and explore more.
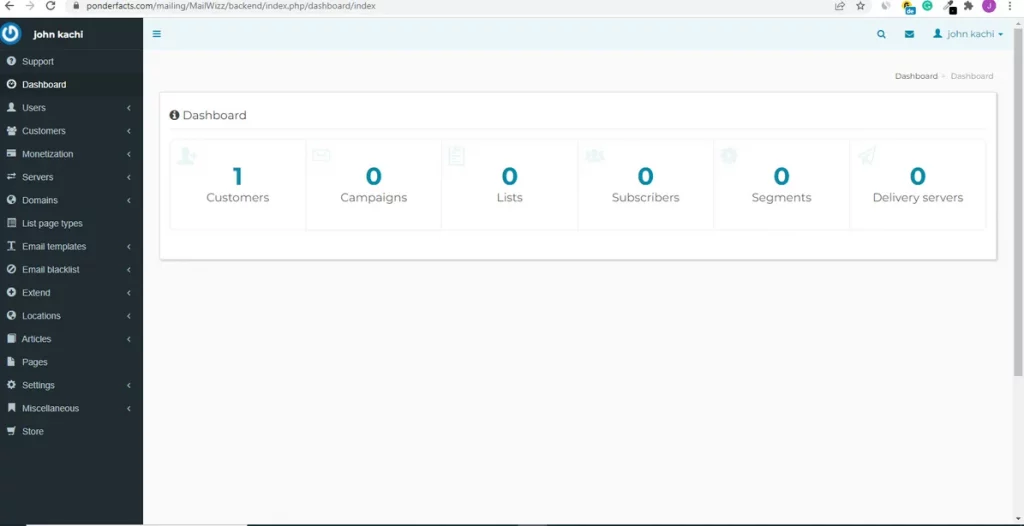
Here is also what your backend or admin area will look like…
Connecting Mailwizz to an External SMTP
Now that you have your mailwizz up and running, you can go on to connect an SMTP so as to send emails. Get SMTP credentials from SMTP companies like mailgun, Amazon SES. You can also set up your own SMTP server from scratch by checking out our previous in-depth tutorial on how to set up an SMTP server and send unlimited emails. To see how to set up SMTP and connect to mailwizz practically, watch the video below:
After watching the video above and successfully setting up your SMTP server, you have to do your warming up diligently before your emails can get to your subscriber’s inbox. It is important because there are deliverability practices that ought to be followed before your emails could win the inbox placement potential.
conclusion
To this end, I will say that mailwizz is a very good Script or application for managing your campaign. One good thing about mailwizz is that it is cheap and it costs just a one-time fee and you have access to all mailing features including feature updates. So if you haven’t gotten mailwizz, I highly recommend you visit codecayon to check it out and probably get it.
Don’t forget if you have any questions of any sort, ask them in the comment section or visit our forum and submit your questions and issues. I and my team will be there to answer all your questions. See you in our next tutorial on good health.