
There are a lot of ways to build SMTP server and send unlimited emails from your own server but in this guide we are going to explore Postal SMTP setup and how to configure postal smtp for optimal inbox placement. Before we proceed I will like to let you know that I have already recorded a postal smtp setup video guide on youtube and you can check it out below:
Want to dive deeper into self-hosted cold Mail Outreach System? Check out my comprehensive Udemy course where I teach you how to set up a powerful email marketing system.
What You’ll Achieve by the End of This Guide
- A Working Postal SMTP Server on Your VPS
You’ll have a custom email server installed and configured on your virtual private server (VPS), capable of sending and receiving emails. - Complete Control Over Your Email Delivery
Managing your own SMTP means no reliance on any third-party providers. You control sending rates, domain configurations, and troubleshooting and everything. - Protection of Your Main Server’s IP Reputation
Isolate your email infrastructure from your main server to safeguard against the risk of being blacklisted due to email spam or misconfiguration. - Unlimited Transactional and Marketing Emails
When properly warmed up and maintained, your server can handle large volumes of emails for both transactional purposes (order confirmations, password resets) and marketing campaigns. - Professional SSL-Secured Email Infrastructure
Securing your email traffic with SSL/TLS ensures privacy, enhances deliverability, and builds trust with recipients.
1: Preparing Your VPS Environment
- Choosing a suitable VPS provider and plan
- Installing the necessary dependencies (Postfix, Dovecot, etc.)
- Basic server security best practices: firewalls, SSH key authentication, updates
2: Installing and Configuring Postal
- Overview of Postal (an open-source mail server management platform)
- Step-by-step installation process
- Initial configuration parameters
3: SMTP Configuration
- Setting up your domain’s DNS records (SPF, DKIM, DMARC)
- Configuring Postal to handle SMTP services
- Enabling SSL/TLS for secure communication
- Setting up user authentication and access controls
4: Ensuring High Deliverability
- Best practices for warming up your IP address
- Monitoring server logs and reputation
- Implementing feedback loops and bounce management
5: Testing Your Setup
- Sending test emails
- Verifying DNS records
- Using tools to check deliverability and spam score
6: Maintenance & Optimization
- Regular updates and security audits
- Managing email queues
- Scaling considerations for higher volume
Important Note: This setup requires port 25 to be open on your VPS.
Many providers block this port to prevent spam. I recommend Verpex or Contabo because they have port 25 open by default, making this process much smoother.
DISCLAIMER – A MUST READ.
Postal is meant for only legitimate senders and not spammers. Setting up your own SMTP server comes with significant technical commitments and legal obligations.
Postal SMTP Setup: Step by step Guide
Now comes the postal smtp setup part – let’s install Postal and get your SMTP server running!
Step 1: Configuring your VPS
Now you have to set up a virtual private server (VPS) on a your preferred VPS or cloud providers. I choose Contabo for this guide because they offers solid server architectures at affordable price, with port 25 open by default. Port 25 must be open for your postal smtp setup to work optimally.
Configuring your Server on Verpex
Verpex also have a similar pricing and port 25 open by default. You can go with this option and it work just as fine as contabo.
You are not obliged to use either contabo or verpex, you can go with any VPS Provider of your choice but make sure to check if port 25 is open using free port checker before proceeding.
Step 2: Connect to Your Server
Use an SSH client like termius, putty or terminal to log in to your server. For this guide I’ll be using Termius as it is an all in one software that helps me to connect to both my SSH and the the vps file system.
If you are using termius with me, just add your server IP address and the password to the relevant fields on termius when you have launched the app and click on connect and you will be on your server commandline. Alternatively, if you are using your terminal, connect to SSH by running the folowing code:
ssh root@YOUR_SERVER_IP
Ensure to replace the ‘YOUR_SERVER_IP’ part of the command with your real VPS IP.
Step 2: Update System and Install foundational components
Next, update system and install prerequisite:
sudo apt update && sudo apt upgrade -y
sudo apt install git curl jq -y
This ensures your server has the latest security updates and the prerequisite for our postal installation.
Step 3: Install Docker Container
Postal runs on Docker, we need to install docker to get our postal up and running:
curl -fsSL https://get.docker.com | sh
Relacx for the installation to complete. This takes a little time.
We also need Docker Compose Plugin for managing multiple containers:
sudo apt install docker-compose-plugin -y
Step 4: Test Docker Installation
Let’s verify Docker is installed correctly:
docker --version
Once the above command execute successfully you should see output showing the Docker version. If it fails or you get an error, restart your server and try again.

Step 5: Clone Postal Installer
Downloading the Postal installation files:
git clone https://github.com/postalserver/install /opt/postal/install
sudo ln -s /opt/postal/install/bin/postal /usr/bin/postal
The above command downloads Postal and creates a symbolic link so you can run postal commands in almost any environment.
Step 6: Install MariaDB
Just like any other mail transfer agent or web application Postal needs a database to store its data and function properly. Let’s install MariaDB:
docker run -d \
  --name postal-mariadb \
  -p 127.0.0.1:3306:3306 \
  --restart always \
  -e MARIADB_DATABASE=postal \
  -e MARIADB_ROOT_PASSWORD=your_password_here \
  mariadb
Important Note: Replace ‘your_password_here‘ with a strong password you can remember or save it where you can remember.
Step 7: Bootstrap Postal
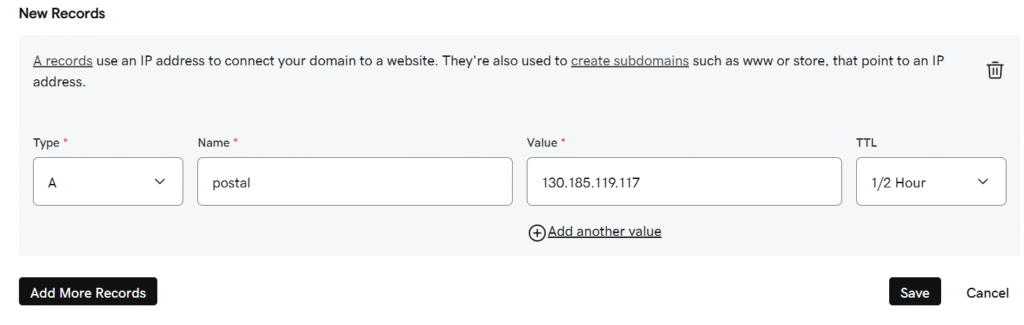
Next in this postal smtp setup is to map Postal to our subdomain, this will help us access our postal server through our subdomain and not our root domain. it can me something like mail.your_domainname.com, postal.your_domainname.com or any sub-domain of your choice but I am using postal.my_domain.com. Now go to your domain provider, then navigate to the advance DNS zone, and add a new A record with the name set to postal, which will be my subdomain, and the value is the IP address of your own VPS, and remember to change to your own IP address. Also undersand you can change the postal subdomain to your own prefferred subdomain (eg mail.) you want to access postal through.
Check the screenshot below:
Run the below command to bootstrap Postal but replace the ‘yourdomain.com‘with your domain:
postal bootstrap postal.yourdomain.com
Step 8: Configure Postal Settings
Edit the Postal configuration file: Run the below command to edit the postal configuration file using the nano editor
nano /opt/postal/config/postal.yml
A file will of this nature will open:
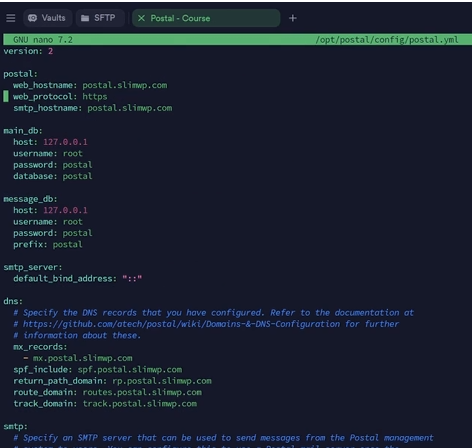
In this file, you’ll need to set the database password (the one you used for MariaDB) in these sections:
main_db:
  host: 127.0.0.1
  username: root
  password: your_mariadb_password_here
  database: postal

message_db:
  host: 127.0.0.1
  username: root
  password: your_mariadb_password_here
  prefix: postal
Quitting the Nano Editor
To quit the nano editor in most operating system, follow these steps:
- Press
Ctrl + X
This will initiate the exit process. - If you have unsaved changes, nano will prompt you with:
“Save modified buffer?”- To save your changes, press
Y(yes). - To discard changes, press
N(no).
- To save your changes, press
- If you chose to save, nano will then ask:
“File Name to Write:”- Confirm the filename by pressing
Enter.
- Confirm the filename by pressing
After these steps, nano will close, and you will return to the command line.
Step 9: Initialize Postal Database
Run the below command to initialize postal
postal initialize
Wait a couple of minutes for it to create all the necessary database tables and configurations.
Step 10: Create Admin User
Create your own postal admin user account:
postal make-user
Follow the prompts to add your emails, firstname, last name and postal password . You’ll use these credentials to log into the Postal web interface.
Step 11: Start the Postal server
Now, start the Postal server:
postal start
Postal should now be running! But, before navigating to it, we’ll need to set up Caddy so we can access Postal with our subdomain with a secure SSL. Caddy handle the postal ssl.
Run the below command and ssl will be installed:
docker run -d \
  --name postal-caddy \
  --restart always \
  --network host \
  -v /opt/postal/config/Caddyfile:/etc/caddy/Caddyfile \
  -v /opt/postal/caddy-data:/data \
  caddy
Now you can access your Postal server securely at https://postal.yourdomain.com!
Now log in with the details you defined when setting your postal admin user.
Advanced DNS Configuration Guide
This is where most people mess up everything, but I’ll break it down into simple terms. Liken DNS records as instructions you give to the internet to confirm the emails sent out from your domain is legimately coming from you.
Sender Policy framework (SPF):
The sender policy framework tells the internet which servers (IPs) can send email on behalf of your domain name. This can be an IP or ranges of IPs.
DKIM (DomainKeys Identified Mail):
This is an email authentication method designed to detect email spoofing. It uses a digital signature to verify that an email was sent from an authorized server and that the message content hasn’t been altered during transit. To set up DKIM, you generate a public DKIM key and add it to your domain’s DNS records. Receiving servers use this public key to verify the DKIM signature in incoming emails, ensuring authenticity. Tools like the DKIM Check tool can test if a DKIM record is correctly published for a domain. For our own case postal already made everything easy for us as it provide us a with SPF, DKIM, Return path and other details needed to configure our return path and other technical details.
Return Path
This is simply where bounce emails are sent when they fail.
rDNS/PTR
This action links your server IP bact to your domain name. This can be seen as the reverse of domain mapping.
Practical Postal DNS Setup:
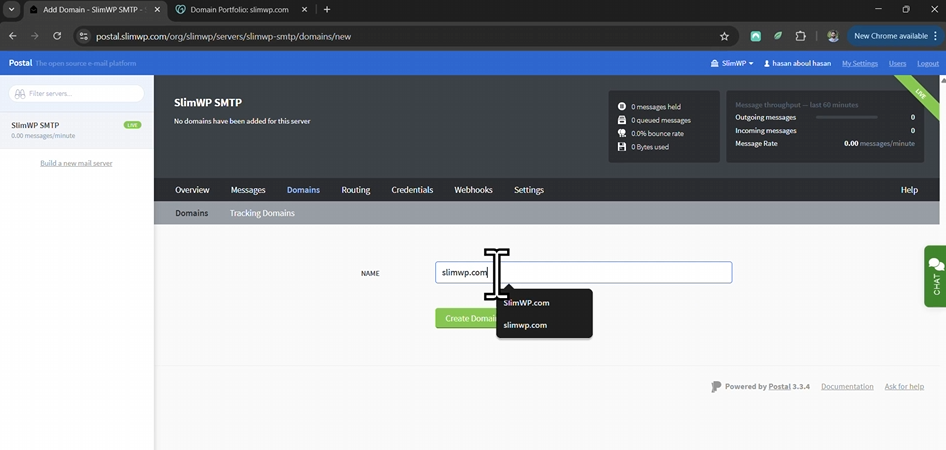
Once you’re in your Postal dashboard, you need to add your sending domain to postal. So, navigate to the Domains tab and add your main domain (not the subdomain) as in below:
And, now we’re set to configure our DNS records to complete our mail server directly from here:
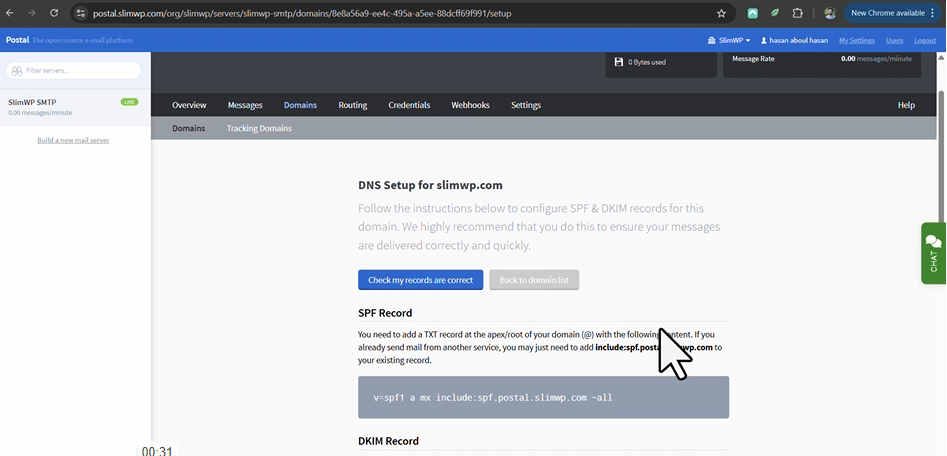
Now, go to your domain registrar like you did during your domain mapping , and add the following technical records that Postal already provided to us.
Technical Details Setup
1. SPF Record (Sender Policy Framework)
Add this TXT record to your domain:
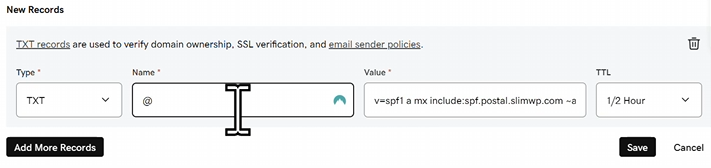
Replace YOUR_SERVER_IP with your actual server IP.
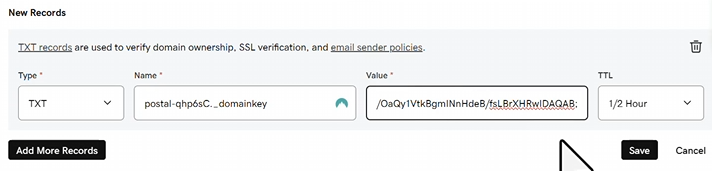
2. DKIM Record (DomainKeys Identified Mail)
Directly below the SPF record on Postal, you’ll find your DKIM name and value, where you’ll add them like this:
3. Return-Path (Handled automatically by Postal)
For the return path, choose CNAME record instead of the usual TXT records, see sreenshot below:

4. rDNS/PTR Record (Reverse DNS)
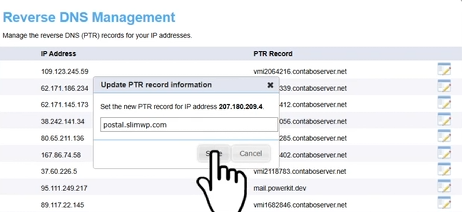
All Email marketing companies and providers query your reverse DNS to ensure your server IP is also pointing to your domain name that you mapped earlier. This helps them ensure you aren’t spoofing. Once email service providers rDNS query returns FALSE, your emails will be sent to the spam. I will go through the steps of how to set it up on Contabo, it should be very similair in Verpex and other VPS providers too:
Setting Up rDNS/PTR Record
- Log into your Contabo Customer panel
- Go to your Reverse DNS Management section
- Find the IP address of the VPS you used to deploy Postal on
- Cick on edit and change the domain to your own:
mail.yourdomain.com
Here’s an example from my case:
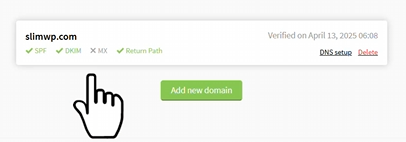
After adding these 4 records, scroll to the top of the page and click on ‘Check Record DNS is set correctly‘:

And after a couple of minutes, it should show you this:
Now, to complete this postal smtp setup, head on to credentials and create your first postal credential. This is the credential you will use to connect to any mailing application such as mailwizz and send emails. I discussed this indepth in my udemy course Email Marketing: Build Own SMTP and Send Unlimited Emails, You can check it out if you want to understand almost everything about technical email marketing. Let’s now look into SMTP warmup because this is where most people mess the whole thing up.
Email Warmup Guide.
Email or SMTP warm up is the process of sending emails slowing and subsequently ramping up volume. We have to go through this process because our IP is a new or virgin IP and the ISPs don’t recorganize it. So, it has practically zero sending reputation. Sending non-promotional emails slowly helps to signal to ISPs that we are now spammers and that our sending is legitimate.
Critical Warning: Don’t start sending thousands of emails immediately! Your new IP address has no reputation, will land you in spam folders or get you blacklisted.
The IP Warmup Process
Email warmup is gradually building your IP’s reputation with email providers. Here’s why it matters:
- New IPs are treated with suspicion
- Sudden high volume = spam in the eyes of ISPs
- A gradual increase builds trust
- Good engagement rates improve reputation
This is the end of this guide and if you have any question pls comment them below or send me an email at [email protected] so just escalate a question in our forum and I will do my best to help and assist.