There are various ways to setup smtp server and send unlimited emails. Here at J-insights, we have explored how to setup an SMTP server with postal. There are still other mail transfer agents to setup SMTP servers such as PowerMTA, Exim, Postfix, etc. In this tutorial, we will see how easy it is to setup postfix and configure everything. The most interesting part of the whole setup is that we are not going to install Postfix manually, like the way we did with postal, powermta, etc. We’re going to just install a control panel or a web hosting manager just like cPanel, known as webmin. Webmin will help us pre-install postfix automatically. All we have to do now is to just configure. Without much talk let’s see…
Components of An email marketing system
To better understand Setup SMTP Server and Send Unlimited Emails, I feel we should really understand the different components of an email marketing system. Off course we already have a guide on the different types of email marketing systems and marketers. I encourage you to go over it so as to understand everything deeply. But for the sake of this tutorial let’s go over the little we need. There are two components of an email marketing system:
- The email marketing application
- The SMTP server, also known as the delivery system.
The email marketing system (EMA)
To make things very simple, An email marketing application is an interface where you manage your email marketing stats. Here you can create and manage your email lists, create and send campaigns, track open rate, and click-through rate, perform A/B split test, etc. This part has nothing to do with the delivery of emails to your subscribers.
The SMTP server/ the delivery system
SMTP is short for simple mail transfer protocol. This is the technical part of an email marketing system that delivers the email you typed on the email marketing application to the subscribers. Just assume an email marketing application to be your phone while the smtp is your internet service provider which helps you to make calls or access the internet. Your phone helps you to collect and save numbers just like the email marketing application which helps you to collect and save emails in organized tags or lists. Just like we have different internet service providers for our phone calls is the same way we have different delivery networks or mail transfer agents for sending emails. The mail transfer agents can be postal, postfix, exim, power MTA, etc. While the email marketing application can be Mailwizz, moosend, mailster, etc.
Note: in email marketing companies like systeme.io, getresponse, convertkit, etc, both the email marketing application and the SMTP server are integrated as one platform. In such companies, all you have to do is to sign up for their free or paid plan upload your lists, and begin your sending. in our own case, our email marketing system and delivery system are going you be separate. All we got to do is to connect both of them together, warm up our newly built system, and send unlimited emails depending on your server resources (CPU, RAM, etc). This is unlike email marketing companies where you have to subscribe to a plan for a particular list size or for a pay-as-you-go plan.
Setup SMTP Server and Send Unlimited Emails, Let’s get started!
Before we fly on the strength of our wings, let’s see the purchasing requirements to Setup SMTP Server and Send Unlimited Emails:
Requirements to Setup SMTP Server.
Here are the main requirements to Setup SMTP Server and Send Unlimited Emails:
Getting a Domain Name
Domain name is the address of your website like j-insights.com. To send an email you need a domain name just like j-insights. You can then create domain emails like [email protected]. if you just want to send emails to your blog subscribers that genuinely opted into your email list, you can use your main domain email just like [email protected]. But if you are doing a cold mailing, you need to get a clone domain for your mailing purposes.
What is a clone domain?? A clone domain is a domain that resembles you’re domain name especially when it differs from your main domain by extension. Let’s see an example: Take my main domain name to be j-insights.com. Consider another domain name j-insights.io or j-insights.net. Two domains resemble my main domain, the only difference is the .io and .net extensions. So, if you are doing cold mailing I advise you to get a clone domain to avoid being blacklisted on your main domain. If people report spam, or your domain gets blacklisted for spam you will be sure that your main domain is safe.
There are different registrars where you can get your domain name. A few of them are:
in this tutorial, I will go with Namecheap. You are not obliged to go with Namecheap. You can go with any registrar of your choice.
Getting a VPS server
To setup SMTP server and send unlimited emails, we need a VPS server. Not just any type of VPS, but the one with port 25 open. unlike the conventional web hosting, we are familiar with, we need port 25 to be open in our VPS server. This tiny port is what is required for us to be able to send outgoing emails from our server. The few companies below are the ones that allow port 25 open on their VPS server. So, it doesn’t matter the VPS provider you are using, just ensure that they allow port 25 to be open on their server. You can verify this by searching online or by messaging their support and asking if port 25 is open on their VPS.
To make things easy we already have an article that outlined the lists of VPS providers with port 25 open. I have taken time to talk with their support and they confirmed their port 25 is open.
Note: These are not all the companies there is that have port 25 open. You can always reach out to the support of any company and they will give you the right directives. Now let’s continue with our VPS purchasing requirements and configure it to Setup SMTP Server and Send Unlimited Emails.
VPS Configurations
Go to turnkey internet, contabo, hostwinds, vpsbg, or ovhcloud and create or choose a VPS server of the following specification:
- Ubuntu 18 x64 as your operating system
- 1 CPU/2 GB RAM (And resize to increase performance later).
Let’s see some sample architecture below:

As you can see contabo least plan is more than the least requirement, so we are good to go.

Whatever company you are going with, you can see the least requirement is met too as in vultr above.
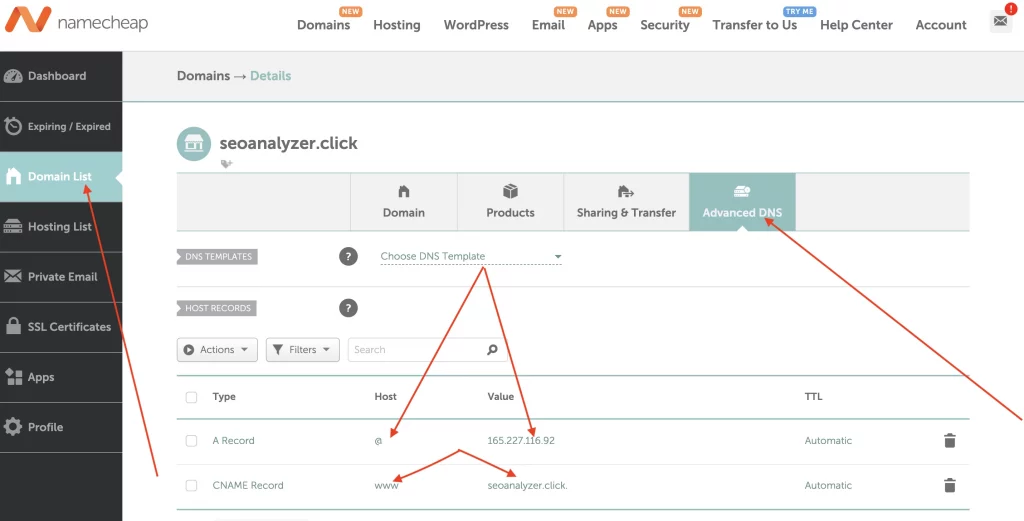
Mapping Your domain name
Domain name mapping is the process of pointing your domain name to the IP address of your VPS server. This is a must-do process both in web hosting and email marketing. In web hosting, it helps to access your website with a domain name instead of the weird IP address of the VPS server. Additionally, in email marketing, domain mapping helps email clients like Gmail, outlook, yahoo, etc to track which server emails are coming from. This helps them to track down spam, fraud, etc. Most email clients made this compulsory, alongside updating reverse DNS (also known as IP mapping) as this will help protect their clients (Gmail users like me and you) from potential threats.
Domain mapping is very easy and you will how easy it is below on Namecheap:
Setting up the SMTP server
Our VPS configuration is done. Now let’s start the installation of our SMTP software or the delivery system. Recall we said earlier that we are going to be using Postfix as our email marketing software. So, let’s see how we can install Postfix very quickly.
Install the WHM (Webmin) Software.
To install Postfix, we need to install Webmin. Webmin is a web hosting control panel that can help you easily manage directories and different parts of your website. Just like other mail transfer agents, installing Postfix manually can be very challenging. Installing Webmin makes the whole process to be automated. It automatically installs and configures Postfix for us.
To Install Webmin, simply run this command on your server:
wget http://software.virtualmin.com/gpl/scripts/install.sh
Running the above command downloads the Webmin installation script. To initiate the installation run the following command:
sudo /bin/sh install.sh
Great and we are done. Isn’t that simple? Just chill till you see the success message below. This confirms the installation process is complete.

Now let’s complete our remaining setup through the web browser.
Open your Web Browser and Navigate to your Server URL which is of this order https://YOUR_SUB_DOMAIN:10000
The10000 means that webmin is accessible through port 10000, ensure to add “:10000” after your VPS ip.
*Note: sometimes Port 10000 may be blocked by the firewall, so you need to unblock it.
Opening Webmin for the first time greets you with the message below safety risk message.

Click on Advance, then proceed to youripaddress (unsafe).
Here we go ….. you will see the below field to login to the webmin
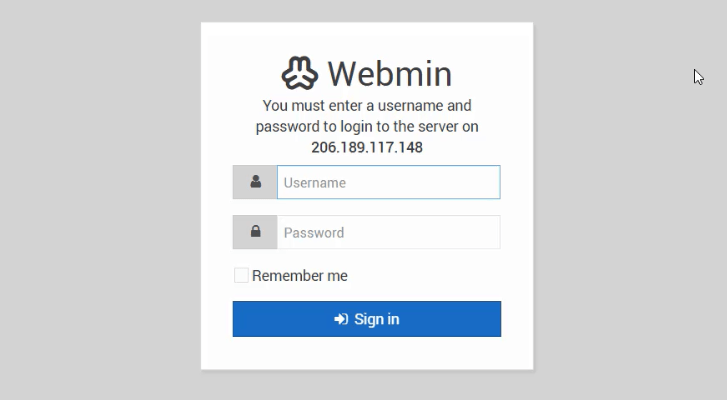
Supply your root login credentials and sign in. Every other configuration will be finished in the Webmin interface.
Webmin Basic Configuration
You will see the post-installation wizard as the one below:

Adjust the options to the below settings:
- Preload Virtualmin Libraries: YES
- Domain Lookup Server: YES
- ClamAV Server Scanner: NO (It will use a lot of Resources, Turn it On if you have a lot of CPU and RAM)
- Spamassassin Filter: NO (It will use a lot of Resources, Turn On if you have a lot of CPU and RAM)
- MariaDB/MySQL Server: YES
- PostgreSQL: NO
- Set MySQL password: “ENTER_YOUR_SQL_PASSWORD”
- MariaDB/MySQL Database Size: Medium
- DNS Configuration: check the box “Skip check for resolvability“, and click next as in the image below:

Configuration of Webmin DNS
- Password Storage mode: Here Choose Any, for Higher Security, Select Hashed. Since we prioritize security in our email sending.
Click on re-check, refresh configuration, then wait for the operation to run. You will see a success message below:

Great! ☑️☑️☑️☑️
Creating a Free Business Email
To send an email from our server, we need an email address to send from. An email address like [email protected]. To such an email in Webmin, we need to first create a virtual server inside Webmin by adding our domain name.
How to create a virtual server inside Webmin
To create a virtual server, hit “Create Virtual Server” on the upper left corner of your display interface as seen in the picture below:

Here, fill in the following details: domain name, Description, and password for this virtual server.

Hit on Create server ☑️☑️☑️
Creating a User Account Email
Click on edit users as shown in the screenshot below:

Click on “Add a User to this server“, and see a new wizard as below:

Now create whatever business email you want say admin. This will automatically create an email of the order [email protected]. Enter name and email password. Then hit on create.
That is it. our SMTP server is now ready 💯💯💯
Since this is a virgin server, we need to warm up and follow the deliverability best practices to get the best out of our email sending.
Before we go into IP warming, let’s see the let consider a few technical details that needs to be configured on our server to improve our email deliverability and inbox placement.
Dkim (DomainKeys Identified Mail) Configuration
DKIM is a text record that is added to the advanced DNS zone of your domain. This holds a public authentication/validation key. This key will be validated using a private key saved privately in your server.
All emails sent out of your server will be marked and signed with a signature, this will avoid any compromise and protect your email originality. A lot of email service providers require you to update your dkim record to give high sending scores and reputation to your server. Check the screenshot below to see how to configure dkim on Postfix:

Setting up dkim is quite simple, we need to set it up first on our Server, and after that, we got to copy the public key to our advanced DNS management zone.
Hit “Domain Keys Identified Mail” under “Email Settings“
Hit ‘Install Now‘. After the installation finishes, go back again to ” Domain Keys Identified Mail” and you will the option to generate your keys.

Keep the Defaults, and click Save.
Next, Hit on DNS records under Server Configuration.

Just Copy the Dkim record and create it in the DNS Zone of your Domain. After that, you are done with your dkim setup. Congratulation 🎉🎉🎉🎉🎉
SPF(Sender Policy Framework) Record Configuration
SPF record is also a TXT record that is added to your Domain DNS Zone. This allows you to assign the mail servers that are allowed to send emails from your domain. So what do I mean by this?……
In a simple word……. Spf record helps to reject emails sent from other servers that are pretending to be You.
Very Simple…….
So, messages sent from a server that is not included in the SPF record will be identified as spam and sent to the spam folder or rejected completely.
For instance: you cannot expect to send an email from your own server and set your sending email as “mail@facebook.com,” and you cannot use Facebook’s domain email to send an email from your own server. This simply shows you are a spammer.
Just like the Facebook example I gave above, you can authenticate your server SPF with your domain and prevent anyone from using your domain to send spammy messages. SPF is very crucial because it makes your domain trusted by email clients like Gmail, outlook, yahoo, etc.
v=spf1 a mx ip4:XXX.XXX.XXX.XXX -all
Replace the xxxx above with your server IP address and update the TXT record at the DNS management zone of your domain.
By doing this, it is only your server or m maybe other servers, or other servers or domains that you do this for will be able to send emails using your server.
DMARC (Domain-based Message Authentication, Reporting & Conformance) configuration:
The dmarc record is a Txt record just like SPF AND DKIM records. It employs the SPF and DKIM protocals to determine the trustworthiness of the email sent from your domain or server.
DMARC provides a layer for Internet Service Providers (ISPs) to block and sanction poor email practices like domain spoofing and phishing and social engineering.
It allows legitimate email senders to specify how they want email clients like Gmail to handle emails that were not authenticated using SPF or DKIM rules. Senders can set the Dmarc to send such emails to the spam or reject it or block such emails completely.
MX Record Configuration
MX record is another form of record added to the DNS zone of your domain. The MX record ensures your emails are delivered to your email addresses.
In a very simple concept, MX record functions to hello the world which mail servers accept incoming mail for your domain and where emails sent to your domain should be routed to. If your MX records are not correctly configured to the right location, you will not receive emails in your domain emails.
Well understood
Great ✔️
Our Server is now ready for sending emails but; See a sample mx record setup below. Just go to any domain registrar you are using and choose mx record and update your records accordingly as below:

Now your server is 100% ready. But wait, before you send your first email you need to warm up your server. let’s get into it.
SMTP server Warm Up
When you just set up a New SMTP Server, Just before You send out your first campaign, you have to do your Server IP Address warm-up.
What is IP warming?
When you bought a public VPS IP from Vps companies, it has zero reputation and nearly 100% possibility of any message sent out of it going to the spam folder. We have to send Emails slowly and increase over time so that, ISPs can trust us and allow emails from our new server to pass their spam filters. This concept of sending emails gradually and rapping up volume (increasing volume) per day is known as IP warming. The below graph warms up and rap up volume for 1k email subscribers.

To this end, I am confident we now know how to Setup SMTP Server and Send Unlimited Emails. If you need anything or have any issues in setting up SMTP using Postfix make sure to contact me via email or kindly open a question on the forum.