There are thousands, if not millions of saas businesses scattered all over the internet. This can be attributed to the different factors; which are not limited to the quest to solve pressing problems, make money, and generally feel fulfilled and be part of humanity. A buoyant fraction of the most successful saas businesses today are hard-coded and require a great team and skills to get steadily up and running. Now the question is …, how can anybody start premium URL Shortener Saas Business in the absence of complex skills and a team? What are the options available for anyone who wants to start a premium URL Shortener Saas Business without breaking the bank financially or on strange technicalities? Let’s see….,
Options to start premium URL Shortener Saas Business
There are a lot of ways to set up and launch a premium URL shortener saas business. We explore them all and itemized them into 3 viable ways:
- Learn programming and web development and launch your saas business
- Hire a programmer on freelance marketplaces like Upwork or Fiverr and give them your idea to build for you.
- Buy an already-made premium URL shortener saas script and host it on your server and you will be good to go.
In this guide, we will go with the third option simply because; it is the easiest. So, you can get everything up and running within the twinkling of an eye.
What is SAAS?
SAAS is short for software as a service. This can be either a mobile or web-based software application. You may be familiar with chatgpt Premium, Netflix, Twitter premium subscription, etc. All these are all saas services, which you have to pay monthly, quarterly, or yearly depending on the plan you chose.
SAAS; or software as a service, is a cloud-based service where instead of downloading software to your laptop to run an occasional update, you access the application via your browser.
Since we’re rooting to set up a premium URL Shortener Saas Business, you need a premium URL shortener script. There are a lot of marketplaces to purchase a premium URL shortener script but the most reputable in my experience is codecayon ( one of the Evanto marketplaces).
But wait…, before then, there are some factors you need to bear in mind before getting an already-made script from any marketplace. Let’s see…,
Factors to consider when choosing a premium URL
- Choose a great script with an intuitive design.
- Find a script with an intersection of intuitive design and great customer support.
- Make sure to white label and customize the script to reflect your need and uniqueness.
You may like to check out our article on how chatgpt will never replace google
Premium URL Shortener Script Setup
As I have said before, this is an already-made script you can buy from the script’s authors. They’ll give you the license to install it. You’ll also have access to further updates on the hand and access to varieties of integrations like Stripe if you get the extended license. In this tutorial, we are going to be using the premium URL saas script from Codecayon. Remember that some people might have bought it, so, you have to be different by tweaking things like the color, and a few other things to your taste to be unique. Was the premium URL bought?? Let’s go… 🔥🔥🔥
Requirements to Setup premium URL shortener saas business.
Just like any normal business, setting up a premium URL shortener SAAS business have some requirements to get things up and running. And don’t worry, the requirements are not enormous. Let’s see below:
Getting the premium URL shortener script
As of the time of writing this article, the premium URL saas script cost only $45 and it is a one-time fee. So, you don’t have to pay for anything more in the future. You can get it from codecayon ( one of the Evanto marketplaces) and start using it for your business and for your client too.

A quick note before we continue: Before you purchase any script from script marketplaces like codecayon, there are things to look out for. This will ensure you don’t run into issues with the script in there future. Just like in the screenshot above, try and look out for the number of sales. I believe that if a script is great a lot of people will buy it. for instance, the premium URL script we are using in this setup at the time of writing has gathered 7,565 sales.
Also, check out the support and comment section of the script to see how great their support is and how the authors respond to comments. This is very important because, you are setting up a business, and you wouldn’t want to set up businesses that won’t stand the taste of time. From the screenshot above, the support ticket and comment are 746 and 6.500+ respectively. That is a lot and it indicates one thing, which is responsiveness. So, we are safe.
Lastly, just like I said before; you need to white-label; the script to look different. Try to be different, change the color, remove settings that don’t fit into your brand, and add ones that suit and you will be ok. That being said, let’s continue….,
Getting a domain name
A domain is the address of your website and as a consequence, you need to have a domain name since, the premium URL Shortener Saas Business is going to be accessed through the web. There are a lot of domain registrars where you can get a domain name. You can check the list below:
These are not all domain registrars there are on the internet. They are just the most popular on the lists. So, feel free to use any domain registrar of your choice but ensure they allow you access to the DNS management zone of the domain you buy. For this tutorial, I’m going with Namecheap. Just head on to Namecheap, the process is pretty easy. Choose your domain name. Make sure the domain is short, concise, and reflects what your brand is all about. Enough of justasknnannajohnonyekachiogonna.com. Go for names that are sexy and can be subconsciously remembered by your audience. Domain bought?? Great ✔️✔️✔️
Getting a VPS machine
While the domain is the address of your website, the VPS server or machine is where your website files and folders are seated. This is called web hosting. To make things super simple, just like liken web hosting to a piece of land whilst a domain name is the road that leads to your land. Anyone who wants to visit your land has to follow an address to access a piece of land. For anyone to access the content of your site through your domain name you have to upload the website file to a web host and map your domain to your host. Don’t worry if you are not familiar with the terms, you will soon see how everything is simple as we proceed. I explained the concept of web hosting in many guides on this site. For now, let’s focus.
Below are the best providers you can get your VPS server or machine from:
Can you use any provider of your choice?? of course, Yes? Go with anyone you feel comfortable with. For this tutorial, I recommend you go with contabo. Why contabo?? I have simply two reasons:
- it is the cheapest on the Internet.
- At the cheap price the of the best VPS architecture. Imagine offering 4 vCPU Cores, 8 GB RAM, 50 GB NVMeor 200 GB SSD, 1 Snapshot, and 32 TB Traffic (Unlimited Incoming) just for $8.49/month. You can’t get such anywhere on the internet.
In this tutorial, I will show you how to configure things on contabo and vultr. The process is the same, irrespective of the VPS provider you’re using. it can’t be more than interface difference. Let’s see…. 💪💪💪
Getting VPS from Contabo
Head on to the contabo website and navigate to cloud VPS and you will see a page like this. Also, know that the page might have changed depending on when you are visiting contabo as they might redesign it.

You can go with the least architecture of 4 CPU and 8 GB RAM. It is very much enough to run saas business like the premium URL shortener SAAS script.
Here the next thing we are going to do is to configure our VPS to be ready to run our web application.

Select your server term, region, and storage type. Pls, understand that some data centers or regions are not free. You can go with the free region which is Germany.

Under server image choose LAMP on Ubuntu 18.04.
What is LAMP Stack
LAMP is short for Linux, Apache, MySQL, and PHP. Linux is the operating system, apache is the web server, MySQL is the database and lastly PHP is the programming language. This four software in one bundle is known as LAMP stack and is used by developers to build websites and web applications. So, we have to configure this on our VPS. This helps to make things easy for us without wasting time installing them singly.
Once you choose the LAMP Stack scroll down and and define your password. click on NEXT and checkout. Wait for the contabo team to set up your server for you and within a few hours they will send you an email with your server details and logins.
One more thing click the link on the email and set your hostname or PTR record. This is your domain name. make sure to add your domain name and you are good to go. Now let’s see how this is done on vultr
Getting a VPS machine from Vultr
Go to Vultr and sign up. Make sure to use our coupon code to get a 14-day free trial to test Vultr before making a commitment.
Once you signed up. click on products and cloud compute.

Scroll down and choose your server location.

Choose your server image. Click on Marketplace APPS. Select Lamp on Ubuntu.

Configure your server size. You can go with the $6 plan. Scroll down and add your hostname which is your domain name. Enable backup and the backup frequency if you want your site to be backed up. Hit deploy and you’ll see the installation progress bar. Within 30 seconds vultr will install your server configuration for you.
What next? The next is for us to map our domain name to our VPS IP address.
Domain Mapping
Domain mapping is a way of connecting our domain name to our VPS IP address. This will enable us to access our application or domain name through our domain name and not just the IP address. To do this, just head on to your domain registrar, choose the domain you want to map, and click on manage domain. Choose advance DNS.

Click on add record and add an A record. Under the host section add @ and under the value section add the IP address of your server. Save all changes and we’re done. Now let’s upload the premium URL shortener saas business script and configure it and run our installation.
Uploading premium URL Shortener Saas Business Script.
To upload the premium URL shortener saas script, you have to download it from your codecayon account. Just navigate to the download section and you will see all the products you have purchased from codecayon.
Premium URL shortener saas script downloaded?? great 💪💪💪 let’s upload…,
Note that the downloaded file or script is always zipped. You have to upload this zip file and unzip or extract it inside the var/www/html directory of your server. Enough of the talk ….let’s see
To upload the zipped file you need an FTP client such as WinSCP or Termius. Remember that Termius can serve both as an ssh client and an FTP client at the same time. Though you can go with any FTP client of your choice but I just prefer Termius because it is easy, all in one and you can manage all your servers in one place. Make sure to upload your saas script to this directory var/www/html. This is the root directory of your VPS. Done? great.
if you are on termius you will see something like this

To set up new server login, click on new host, add the IP address of your server, and the label you want to use to identify the server as you may have a lot of servers in the future. Add your vps username and password and you are done.
If you are a window user, download and open your putty ssh and log in as below.

Supply your server details like you did with Termius and you will be in…

Irrespective of the ssh client you are using you will be brought with the Ubuntu server home page.
Now let’s start the installation of some little software on our server.
Install unzip software
Here remember the saas script we uploaded is zipped. we’ll install a small software known as unzip to help us unzip the script in the directory var/www/html. To do this, simply run the following commands:
First, install the unzip utility with this command:
sudo apt-get install unzip
To clear the putty/termius/terminal screen run the command
clear
Locate the var/www/html directory which is where you uploaded your premium URL Shortener Saas script. To navigate to the directory, run the command.
cd /var/www/html
You’ve navigated to the directory. Now run the command to unzip the uploaded file.
unzip YOURFILENAME*.zip
Pls, understand you have to replace YOURFILENAME above with the name of the uploaded file.
Pls, ensure that all the script files are on the part var/www/html. Let me explain clearly. Assuming the script file name Is upload.zip. You will see that all the script files are inside the upload.zip folder or file. if you unzip the files and run the installation, you will see that your script will be installed on yourdomainname/upload. To avoid this you have to move your files inside the upload folder to the upper directory. This will make all the files to be in the same directory as the upload folder. I hope this is clear now. Let’s go oo
Create an MYSQL database
Just like any other web application, you need a database to run your application. This gathers all data on your website and stores it for easy retrieval. Let’s quickly create a database:
Remember, since we already configure the LAMP stack, the MYSQL database is already installed. All we have to do now is to log in to the MYSQL database server, create a database, and a user to run this database with all privileges set to the user. To do this run the command:
mysql -u root -p
You will be prompted to put your root password. Paste it and continue:
Now create a database to run the application. Use any name you like, in my case, I will use TestDb. Run the following command:
CREATE DATABASE TestDb DEFAULT CHARACTER SET utf8 COLLATE utf8_unicode_ci;
Note: Don’t forget to add a semicolon at the end of each command inside the MySQL server (;).
We have created the database. let’s create a user with all privileges and a password to access this database we just created.
CREATE USER 'DbUser'@'localhost' IDENTIFIED BY 'enter_a_custom_password_here';
GRANT ALL ON TestDb.* TO 'DbUser'@'localhost';
FLUSH PRIVILEGES;
Make sure to add your password in the password field above. Also, flush all privileges to affect all our changes and activities in this instance.
We are done. To exit the MySQL server run the following command
EXIT;
We’re now off the database server.
premium URL Shortener Saas Business Script configurations.
We’re pretty done. The remaining part of our work is going to be completed via the web browser. Go to your browser and type your domain name and you will get an installation interface just like the one below:

The requirements in red above are needed requirements to run the script but they are either missing or not enabled. This is very easy to fix if you are working with Termius FTP. All you have to do is to locate all the directories in red and make the files writable. Once you locate the directory on Termius, just turn the button on and you are good to go. Do it for all the directories on need or not writable.
Now let’s see how it can be done on Windows. Open WinSCP, and locate the directory in question. For instance: let /var/www/html/includes/ be the directory in question. Just right-click on the file or folder and write the number 0777 on the octal field and save the changes.


Tick the box and hit ok. Repeat this process for all other requirements and all things will be set.
Refresh the page and you will see that the reds are all go and we can now proceed with our installation.

‘Here press on requirements are met. You can proceed’
Connecting application to database
Here, let’s connect our application to the database we created earlier.

Supply the database credentials and click on Create configuration file.
Pls Note you might potentially face the error below but I’ll show you how to fix it.

Go to your FTP client and locate the directory /var/www/html/includes. Rename the config_sample.p file to config.php.

Once this is done. if you return to your web browser you will see database has been imported.

Supply your admin credentials and site path which is your domain name. You wouldn’t like to install it on a folder. Hit finish installation.
Delete the install file (install.php) and great our premium URL Shortener Saas Business script is 100% ready for use to use and offer to clients on a recurring basis.
But wait…. we may likely get an error like the one below and I will show you how to fix it quickly.

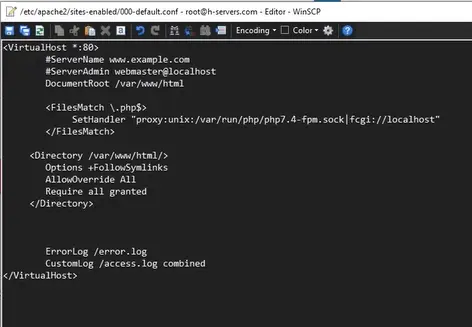
To solve this issue, navigate to the directory /etc/apache2/sites-enabled/000-default.conf file. Edit the 000-default.conf and paste the code I am going to give below into the file.
<Directory /var/www/html/>
        Options +FollowSymlinks
        AllowOverride All
        Require all granted
     </Directory>
Then save changes. Check the screenshot below to see how I did it including pasting. the code.
Hit save changes as I said before.
Now we need to restart the Apache web server. To do this, log in to your ssh via Termius, putty, or Mac terminal. Then run the following command:
sudo systemctl restart apache2.service
Refresh the website and you will see that everything is now working perfectly.
Now we need to secure our server with SSL. Let’s see how we can do this….,
Install SSL on the Premium URL Shortener saas site
Installing an SSL certificate to secure our website is crucially important not just for SEO but for the overall user experience of our site’s visitors. This helps to encrypt all traffic sent to our site to the secured version of the web (https). This will help to secure our domain and website from hackers and other forms of malicious attacks targeted at stealing sensitive information from our website.
Securing our site with SSL costs a lot of money if we are to go with premium SSL. Thank God for the lets-encrypt authority (a foundation on the mission of securing the web for free). They have developed a free SSL certificate that anyone can issue to their servers and get their servers secured from all malicious intrusion. No more talks …let’s see ….,
Connect to ssh via putty/mac terminal/termius
The first thing you have to do is to install the let-encrypt client.
Install lets-encrypt client (certbot)
In simple terms, certbot is a client software already running on your server. The job is to help fetch Let’s Encrypt certificates for installation on your server.
To install Certbot, first, add the repository by running the command:
sudo add-apt-repository ppa:certbot/certbot
Hit ENTER to accept.
Update the package list to pick up the new repository’s package information:
sudo apt-get update
Install Certbot’s Apache package:
sudo apt install python3-certbot-apache
If it didn’t work remove the 3 in the code above and run the command.
Congratulations, certbot is installed and ready to fetch the let’s encrypt certificate.
Install SSL certificate
issuing a lets encrypt certificate for Apache using Certbot is simple. certbot will auto-obtain and issue a brand new certificate that is valid for the domains defined as parameters.
Run the command. make sure to change the domain to your own unique domain:
sudo certbot --apache -d YOUR_DOMAIN_NAME
Here you will be required to input an email address for lost key recovery and notices, you have the flexibility of choosing between enabling both http and https access or forcing all requests to redirect to https. It is usually safest to require unless you have a specific need for unencrypted http traffic. which I am not sure you have. So, ensure you redirect all traffic to HTTPS.
Check your website now and see if it is secured with the help of the let encrypt authority.
Congrats…,
This is about setting up the premium URL shortener saas business even if you have no background in programming. And I’m always here to help you with any questions you might have in the course of setting up this business model. make sure you comment your takes and questions in the forum or ping me via email or comment below and I will be there for you.