If you are a developer with a specialty in PHP language or a non-techy who bought a PHP website or script from one of the Evanto marketplaces like codecayon and you have been looking for a detailed over-the-shoulder guide on how to host PHP website you are in the right place. Here I will show you how to host PHP website and get everything up and running without breaking your head on strange technical hassle
Before we go further, let’s take a mind tour of the requirements to host PHP website or web application.
Requirements to host PHP website.
- A domain name
- Get a VPS server
- Domain mapping
- Enable super user access in the VPS (That’s if not enabled by default )
- Create a MySQL database to run your Web application
- Uploading the script files to the server
- Issue an SSL certificate to your server
- Installing PHP modules and extensions
- Start the apache web servers
- Connecting the database to your web application
- Setup cronjob (if need be)
I know that some of the requirements above are familiar while some are strange, especially for a newbie or non-developer. The good news is that I explained everything in easy-to-grab steps. I’ll also like to add that in this tutorial; I’m going to use a script known as Seoanalyzer. This is an SEO tool that will help you analyze the current SEO status of your website and know the potential SEO issues to get a better appearance in Google search results.
If you want exactly this tool, you can go here at codecayon to review and get it and follow up. But, if you have an entirely different script in mind don’t freak out, to host PHP website is almost the same process. You just have to follow the documentation of the script or reach out to the developer of the script or myself if you face any issues with any script…
Without wasting much of our time, let us go straight to host our PHP website.
Get a domain name to host PHP website
So, what is a domain name?? I know you already know it 😀. But for the sake of this tutorial let me just give it a simple definition. A domain name is simply the address of your website. Just see the domain name as the address to your house while the host is the land where your house is built and the house in this scenario are our site files or PHP website files.
Purchasing a domain name is very simple, as simple as the simplest thing you know right now 😀. Just teasing, but getting a domain name is actually very simple. All you got to do is go to domain registrars like Namecheap, GoDaddy, Hostinger, Bluehost, or any domain registrar that allow you access to their DNS zone. It is also worth mentioning that you can get a domain name for as low as $1 on Namecheap or virtually all the domain registrars out there. But my advice is that you choose a domain that represents your business or the niche you’ve chosen.
Domain got great…., let’s move to the second requirement to host PHP website.
Let’s see how we can get a VPS server for hosting our web application
Getting a VPS server to host a php website
Before we go into the process of getting our VPS server, let’s see what in the world is a VPS server.
What is a VPS?
VPS is short for ‘virtual private server’ To make things very simple, it is a place where we copy our application files so that they can be accessible to anybody in any part of the world requesting any resources on our site. Hosting is crucially important not just to host PHP website but any site at all.
At the server-client level ( server-browser level ), when anyone visits maybe our contact page, they are simply requesting files and folders that make up the Contact Us page, what happens is that, as the browser requests those files, our web servers say apache will return the requested file in the form of HTML static page which we now see as the contact us page. So, as a consequence, if any of the files that make up the Contact Us page aren’t correctly copied to the host, the Contact Us page isn’t gonna be properly rendered.
More simply put, we have the browser, the web server ( eg apache, nginx, etc ), and the host (eg. a VPS or a shared host ). The webservers serve as middlemen, passing requests from the browser to the host and the resultant requested resources from the host back to the browser. In purchasing our VPS plan we are going to configure a lamp server on our VPS. The lamp server is a full software stack for setting up ubuntu operating system servers. This will really make our life easy by installing MySQL, PHP, Apache, and all server requirements needed to successfully run our application or host our PHP website.
Hope you got the point. Enough of technical jargon. Let’s see the different hosting options we have to host our PHP website.
Options to host our PHP website
As we already know by now, to host our PHP website, we need a host to copy our files to. So, what are the hosting options available for us to copy our script file to?? Let’s see…
Shared Hosting
This simply means publishing your PHP websites with Webhosting companies like Namecheap, Bluehost, hostinger, hostwinds, namecheap, etc. The implication of this is that your website is hosted alongside hundreds and tens of hundreds of other websites on the same server. The issue here is that since your site isn’t the only site on the server, the speed of your site resolution will somewhat have a reduced function, hence, impacting negatively your SEO given that hosting speed is a very important factor for search engines to recommend your site in the search results.
The question here is, is there a way to make things right and increase the speed and user experience of our site? Well, the answer is fair, yes, and that is by buying a good shared hosting server with a supersonic fast server. But just know that the overall experience is not gonna be compared with the same site hosted on a VPS server. But if you are going with shared hosting you can check out the following shared hosting plans: Namecheap, hostinger,hostwinds, Bluehost, and GoDaddy.
VPS Hosting
Simply put, in this type of hosting you are given your own resources. Unlike shared hosting which has hundreds of websites hosted on the same server, here you have your own server and only your site or your sites will be hosted on it. As you can clearly see here that you have more flexibility and manageability than shared hosting. Here, since you have better manageability and control over what is on the VPS, your SEO will be greatly improved. If we host PHP website on a VPS, it will be a lot faster.
What VPS options do I have ??
Now, you already know that it is best to host PHP website on a VPS server than on shared hosting. So what is the company we are going with?? To be very clear, you can go with any company you’re comfortable with, but in this guide, I will show you three 3 companies that I think are great for hosting PHP websites and have everything you need to get your web app up and running easily. I arranged them in their order, from the best to the least putting pricing also into consideration also.
These companies are:
Now let us go step by step and see how we can get our VPS servers from each of these companies. Note: you just need to buy from one of the companies, and not 3 of them at once. Just go through the purchasing process below and go with just one.
Getting a VPS server from contabo
- Just head on to the contabo website on your browser and navigate to the Contabo VPS page.

Here click View all cloud VPS. You will be brought to this page.

You can start with the lowest plan. But if you have enough budget you can buy higher plans with more resources. Better still when your business has grown, you can get a higher plan with more resources. But for now, let’s go with the cheapest plan.
Just click Select and you will be directed to the next page which is the configuration page.
- Configuring your VPS

Choose the storage type and location of your VPS. The location is simply where you want your site to be located. Just know the closer your site location is to your site visitors the faster your site’s resolution or average response time to your visitors. By default, it is gonna choose a free location for you. In my own case, it is Germany. You can also choose other locations with faster servers, but you can see it is not free. you need to extra between $1.45-$3.5 or configure CDN on the free plan that has been chosen for you by default. But, honestly, you don’t even need all these extra features to get started. just go with the free location.
Then, scroll down to choose your server image or imagery. The server image is simply the operating system, admin panel, or server stack you want to be installed on your VPS.

Here we will configure our operating system and the server stack we want to be installed in our VPS server.
Under Apps and Panels tab choose lamp on ubuntu 18:04 operating system. Can you choose other versions of ubuntu OS? the answer is simply yes and everything will still work fine, but I chose ubuntu 18.04 because it is the most stable version of Ubuntu OS.
Just a quick go over, let’s see what is Lamp server.
What is Lamp Server?
Lamp is acronym for (Linux, Apache, MySQL, PHP/Perl/Python). It is a software stack that will install all the necessary requirements needed to run our web application. It will automatically install both Apache webservers, MySQL, PHP, and all the requirements we need to run our PHP application.

As in the above screenshot, you can see that the default username given to you by Contabo is root. All you have to do now is to input the root password you’ll want to access your VPS with. Click on Next.
If you are prompted to add a ptr record ( also known as hostname ) just add your domain name or subdomain or any URL you want your site to be accessed through.
After this is done just continue to the billing page by creating a free account or login if you are an existing customer. Then check out and go to your email to confirm your order. The contabo team will set up your server for you in 24 hrs or less.
2. For Vultr
Note: if you are going with vultr, you may love to sign up with the coupon link below to get a free $100 credit to use and test out vultr for free for 14 days.
Just head on to vultr on your web browser through this coupon link, create an account and you will see a page like this

Just verify your billing information. Don’t worry you won’t be charged till the 14 days of the free trial is exhausted. Though there might be a refundable charge on your card specifically for verifying the validity of your card. Once this is done.

Head on to products, select cloud compute, scroll down
Under CPU & storage Technology and server location.
Select your CPU and server location, say new york

Then scroll down to the server image

Click marketplace apps.
Select lamp on Ubuntu 20.04 x64
Choose your server size, choose your plan, say the $6 plan.

Going down you will notice that the overall cost for this plan is $7.2 instead of $6. That was due to the backup that is enabled by default. You can disable it if you don’t want the backup feature. But for me, I’m going to disable it to round the cost to $6. You can also add a lot of other features to your server depending on your need and budget.

Then Scroll down further and define your hostname. This is literally your domain name or subdomain or any link you want people to access your application through. Label the server with an easy-to-remember name; should in case you have multiple servers in the future. In this guide I’m going to use the domain name seoanalyzer.click as my hostname.

Note: Hostname is equivalent to ptr record in contabo.
Then under label simply label the server.
Go down again and click on deploy and vultr will create your server for you.
It is that simple
3. For DigitalOcean
In the course of this tutorial, I also got a free $200 coupon credit so that you can test out everything for free for 60 days before you make a commitment.
Note: I’m going to be using digital ocean in this tutorial. But I strongly advise you to go with CONTABO or VULTR.
Why am I using Digitalocean for this tutorial?
From the onset I arrange, I arranged these three VPS companies according to my preference from Contabo >>Vultr >> Digitalocean. This is due to my experience in years of using them. But the question is why am I using the last in my priority digitalocean? The simple answer is that contabo, being the best does not have any coupon links. Aside from that, they charge a setup fee, though this decreases to zero with an increase in your VPS plan duration. For instance: if you are ordering for 1 month, the setup fee will be higher than the setup fee when you order the same plan for 2months. That goes on to zero level at say 1yr, ordering the same plan.
For Vultr they give a free $100 coupon credit to test their platform for just 14 days. I will go for Vultr actually in a list where contabo is absent.
Then, for digitalocean, they give a free $200 coupon credit to test out their platform for 2 months. Hence, my decision to go with digitalocean. since I know that some of my audience may not have a budget to start ASAP. They can use this coupon link to test out digitalocean before they can migrate to a better service. But, if you are not a beginner, don’t waste time and go with servers that have optimal performance.
That being said, let’s see what purchasing a VPS on digital ocean looks like.
DigitalOcean VPS
Just go to digitalocean through this coupon. You’ll see the popup to get the free $200 coupon. Click on it, sign up, and verify your billing address.

Note: that there may be a temporary refundable charge on your card to verify the validity of your card.
I know some might be thinking, why are they charging my card in the first place but I said you will get free credit to test everything out. well, what I can say is that this is needed in almost all hosting companies to verify you are a real serious customer so that they don’t keep an unnecessary database of people who aren’t real customers. But, in all, everything is refundable.
Once you are done creating your account, just click create, then click on droplets. Droplet is just a VPS server.

So, create a droplet with the following architecture/specification:
- Ubuntu 16/18/20 x64 as your operating system.
- You can start with 1 CPU/ 1 GB RAM (You can resize later).
Just follow up just lie the way we did in Vultr and create your droplet.
Great you’ve got your VPS server.
You can check out more of our blog category here.
3. Map your Domain domain to your VPS server
Let’s go a little bit technical here. Any website on the internet can be located through an IP address. For instance: if we upload our PHP website or script on the VPS machine that contabo, vultr, or digitalocean gave to us, if you copy the IP address and paste it on a web browser and click on search, you’ll see, if all the requirements are met for the application, your website will surely resolve.
But, there is an issue here, look at this IP address 102.89.23.229. You will notice that it will be very difficult to remember, and even if you try to remember, how many will you remember for different websites? so, to solve this issue, the domain name system also known as DNS came through. The domain name system or DNS is the process of mapping a memorable name to our VPS machine IP address. These rememberable names are what we call domain names. It is pretty easy to remember a domain name than its resolved IP address hence, the domain name system. So what we are gonna do now is to connect our domain name to our VPS machine.
Namecheap Domain Mapping
Just head on to your domain registrar account and buy a domain name that reflects your brand but for this guide, I will be using Namecheap.
Once you are done with your domain name purchase, just head on to the DNS management zone of your domain to start the domain mapping. Check the picture below.
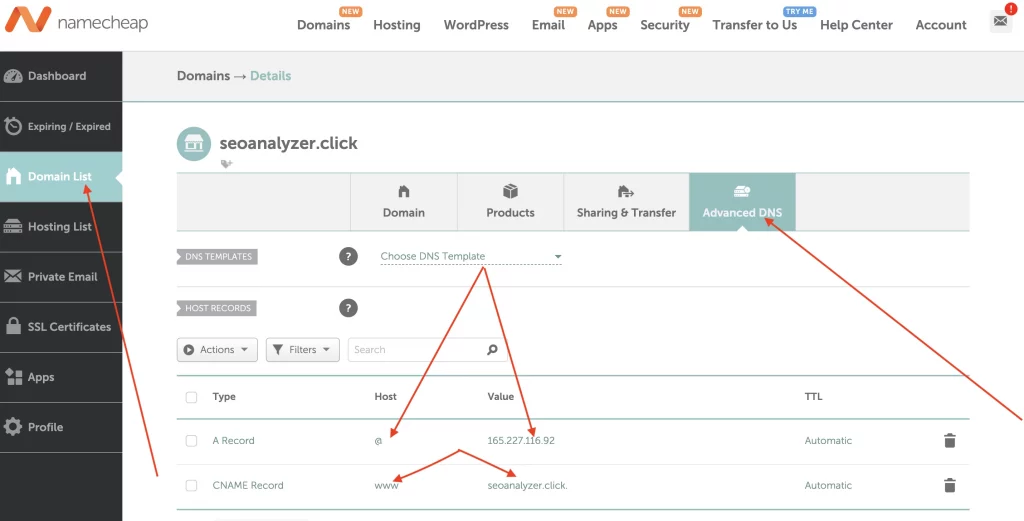
All you got to do is to host the IP value with the symbol @ using A record. Click on add new record and choose A record. What this means is that the domain is pointing to itself. Also, click on the drop-down again and this time around add a Cname record. In the host field, add www and in the value section, add your domain name also known as the hostname or the ptr record.
So, why are you adding a Cname record? well, the simple reason is to redirect the www version of your domain to your root domain. This is so that if anyone searches www.yourdomainname.com they will be redirected to yourdomainname.com. This is very important for your SEO and overall site indexing by search engines. When you don’t have only one version of your domain name google or other search engines will index the two versions of your domain, making you compete with yourself in search results even when both pages and posts have the same content. The summary of the whole thing is that you should ensure you have only one version of your domain name.
Cname added??
Great job
Database Creation
- Create a database
Just like any other web application, running your PHP website or script requires a database to function. All we got to do is log in to the MySQL database server and create a database and a user to access this database. let’s quickly see how we can create one.
It is important to mention that I’m using a Mac for this tutorial and the tools I’ll be using might differ for Windows users. But don’t freak out I’ll cover both window users as well as mac users.
Now let me prioritize window users lol
For window users, you can download two applications:
- Putty ssh
- Winscp
Putty is an ssh client that can help you manage remotely files and directories via the command line. On the other hand, WinSCP is also a remote application that can help you manage your files and folder just like the normal way you can manage folders and files in the gadgets you are using for this tutorial. Now let’s see ….
Just go to putty.org and winscp.org to download this awesome software (for window users)

Downloaded and installed ?? great job
Go to winscp.net and download and install.

Installed? Great.
Now let’s check out the option we have for Mac users.
SSH Connection for Mac Users
Unfortunately WinSCP and putty aren’t available for Mac users. Although, we can download MacPorts and a lot of other dependencies to run putty on Mac. where the issue comes from is that the complete package cost over 40GB to download. Aside from this, it also takes up a lot of space on your hard disc or drive. So, I don’t see this as a viable option for Mac users.
To solve this issue, Mac has its own terminal you can use to connect to your server via the command line instead of following the long route of downloading MacPorts to run putty.
Though this solves the problem. But, personally, I don’t like using a Mac terminal because you can’t save your VPS credential for auto login. So you have to input your IP and password on each login section in the manner ‘ssh username@vpsipaddress’ and then your password. Another issue is that the section duration on the terminal is somewhat short.
If you are off the terminal for like 10 mins while coming back you’ll notice that it will require you to log in afresh. The section time isn’t readily 10mins, I was just trying to describe how short the section duration could be if you are off the terminal on other apps even while you are still using the terminal.
But I found another application that can help Mac users connect to both command lines and manage their files remotely within the same application for 100% free. This application is known as termius. It is available for both Windows and Mac users including Android and ios users. Sounds great?? Let’s see.
How to use the Termius application
Just head on to termius.com, download, install, and create a free account in the application.

Then click on Add a new host. Input your VPS IP or hostname. Remember now that since you have pointed your IP to your domain name, you can now access the VPS via the domain name. Input the VPS password and username and save it. See the picture above.
Then click on the host and you will be able to be inside your command line, super easily.

Also, go to sftp and login also with the same credentials and you will be inside your remote folder. Great, and you can switch from ssh to sftp within the same application. This is really awesome.
Personally, I like intensifying the security of my VPS servers, so I’m gonna change the root password by running the following command:
Sudo passwd
Then type in the new password, and it will require you to retype the password, just retype it and you now changed the password of your VPS.
Then run the following command to request superuser access to manage all the files in the VPS. This step is very important if the VPS company you are using didn’t enable super user access by default. But contabo, vultr, and digital ocean I’m sure they allowed super user access by default.
Just run
Su
It might prompt you to authenticate again with your password, just input the new password you just changed to and you have now enabled super user access. Very Simple
Also, should in case you are not at the root of your VPS, just run
Cd
and you will be in the root of your VPS.

Great.
Now let us create a database to run our web application.
4. Create an MYSQL Database To Run Your Application.
To run most of the PHP websites and applications we need a database. So, let’s create one with the MYSQL database system.
Now, connect to your server through your ssh client. If you are on Windows OS, connect using your putty. If you are on Mac, connect through the Mac terminal or through the Termius application as I recommended earlier.

Great, you are in!
Since we already installed the LAMP Software stack, and MYSQL is part of it, all we need to do is log in to the MYSQL database server, create a user to access the database, assign all privileges and we are done.
Now, let us go practically…
Creating MYSQL Database
To log in to the MYSQL database server, run the following command:
mysql -u root -p
You will be required to authenticate your login with your root password. Just input it and you will be inside the MYSQL database system.
Now, let’s create a database inside the MYSQL database server that will run our application. You can name the database anything, but for the sake of this tutorial, let me call it firstdb. but, you can call it anything. To make everything simple, just run the following command:
CREATE DATABASE firstdb;

It should be noted that; each command in the MYSQL must end with a semi-colon (:)
If the above command is successful, you will see the message in the picture above.
The next command we will run now is to create a user to access our just-created database. I’ll call it dbuser. Feel free to call your own anything.
CREATE USER 'dbuser'@'localhost' IDENTIFIED BY 'enter_a_custom_password_here';

In the above command, ensure to replace your own username and add your own custom password for the user to access the database.
The next thing we are gonna do is to grant all access to our database firstdb to the user dbuser. To do that we will run the following command:
GRANT ALL ON firstdb.* TO 'dbuser'@'localhost';
You will see our usual success message, as in the pictures above.
so, we successfully created a database and a user to access the database with all access granted. What we will do now is to flush all privileges so that the current instance of MySQL knows about the recent changes we’ve made:
FLUSH PRIVILEGES;
Done!
Then exit the MYSQL database server by running the following command:
EXIT;

5. Secure with lets-encrypt Free SSL.
SSL certificates are literarily padlocks used by web servers to encrypt the traffic between the server and client (Browser), providing extra security for users accessing your application. SSL is very important for SEO. Some payment gateways even made it compulsory that you install SSL on your domain before you can integrate their services into your site. Let’s Encrypt provides an easy way to obtain and install trusted certificates for free. All we have to do is install software known as certbot on our server. Certbot will help fetch the letencrypt free SSL on our server.
Now connect to your server command line via putty ssh or through Termius web or mobile app as I recommended if you are on a Mac.
Step 1 — Install the Let’s Encrypt Client
As I already hinted above, certbot Is a lets-encrypt client that will help us to fetch our free SSL
Now, let’s define a repository to install certbot:
sudo add-apt-repository ppa:certbot/certbot

Press ENTER to accept.
Then, Update the package list to pick up the new repository’s package information:
sudo apt-get update
Install Certbot’s Apache package:
sudo apt install python-certbot-apache
Certbot is now ready to be used and to fetch our free SSL.
Step 2 — Set Up the lets-encrypt SSL Certificate
Generating letsencrypt SSL for Apache web servers is pretty simple and straightforward. The certbot software client we installed above will automatically install a new and valid SSL on our domain.
Run the following commands. Make sure to replace the Your_domain_name part with your correct domain name.
sudo certbot --apache -d YOUR_DOMAIN_NAME
You will be prompted to put the email address where you want security updates to be sent. Agree to letsencrypt terms and conditions of service. Allow or disallow your emails to be shared with the electronic frontier foundation, I normally reject my emails being shared. You can allow for yours to be shared, there is no side effect or security challenge in the long run.
Next, you will see a display asking whether you want to redirect or force all traffic to HTTPS or to HTTP. Choose HTTPS unless you have an important reason to redirect your traffic to HTTP. In our own case, we just want to redirect our traffic to HTTPS.
Now test your domain name and you’ll notice it has been secure with SSL.

Now let’s grant some permissions in our server to be able to run the script or our PHP website.
Directory & Permissions
Granting some kind of permission on some files and folders is very important to successfully run our script or PHP website. If you bought a PHP script from codecayon, the developer of the script will define the files and folders you will grant permissions. For instance: if you look at the pictures above you will see the files and folders for us to grant some permission predefined by the developer of the seoanalyzer script I’m using for this tutorial. All we got to do is to open our WinSCP on Windows or termius sftp if you are using Mac and grant all those permissions.
Winscp or termius Sftp opened??
Locate all the specified directories. See the picture below:

Also, edit the folder if you are on the window.
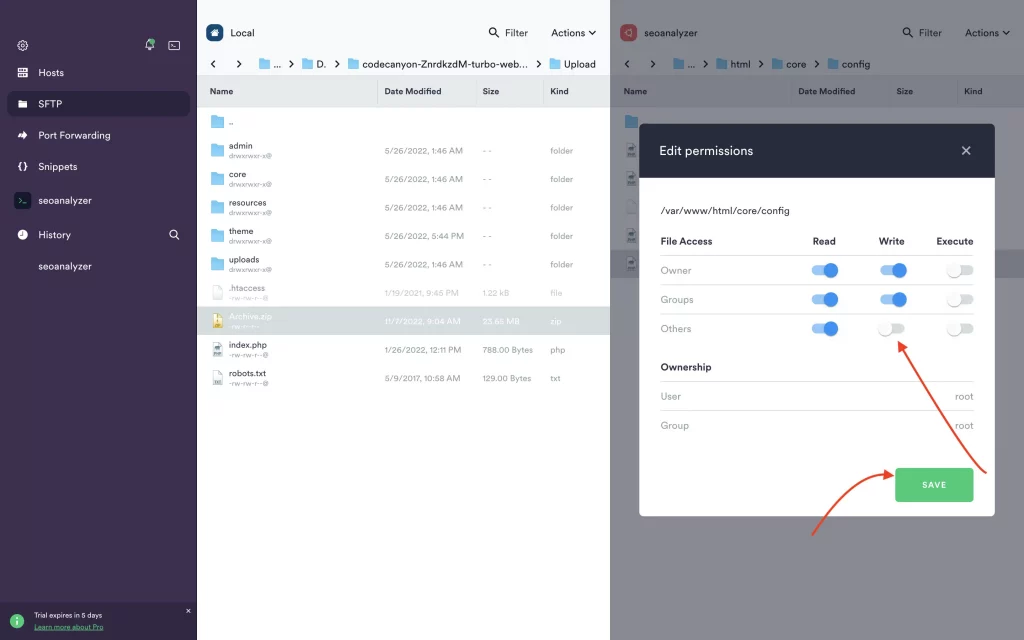
Under write, make sure to switch on the toggle as in the above picture and save changes. If you are on windows, you will see a box with some numbers like 0xx9, make sure to change it to 0777.
Repeat this for all the files/folders that need to be granted writable permission. Reload your website and you will see they are all writable now.

Now, a small thing is remaining, if you look above you will see that two PHP modules or extensions are unavailable. So, let us install them now and connect our database and we are done.
Installing PHP Modules
Open your Putty or terminus ssh and simply run the following commands:
sudo apt install php-mbstring
This is virtually how you can install any PHP module or extension.
Accept some part of your disk space to be used and the module will be installed.
Run the command to clear your screen so that it can be fresh
clear
now let us install the second PHP module which is the curl extension.
Similarly: run the same command as when installing Mbstring but this time around replace mbstring with curl
sudo apt install php-curl
Accept some part of your disk space to be used and the module will be installed.
After these installations, if you go and reload the installation page you will notice that the two installed extensions are also not available even after installing them. To reflect the changes in the installation status, just restart your Apache webserver.
Run the below command to start your Apache webserver
sudo systemctl restart apache2.service
Once this is done, refresh and you will see that your relevant php modules have been installed.

Now click on continue to continue your installations

fill in the above relevant information including your license key for the script you bought from codecayon and you will be redirected to your admin panel.
You will be prompted to delete your installation folder. just go back to your WinSCP or Termius software and delete it. Once deleted, visit your domain name for instance: Seoanalyzer. click will redirect to our real tool site and not the installation page again.
To those end, this is how you can successfully install a tool website even If you are not a developer. So, comment below on what your takes are on this tutorial. You can also post your question in our forum where I will always be available all day to answer your questions.